Moving from Microsoft Word to Google Docs may seem like a daunting task, but in this guide, we'll explain everything you need to know to master this web-based word processor.
Microsoft Word has been around for so long that most people in their thirties have grown up using it. He has been a titan of the word processing industry for decades. However, Microsoft Word's basic format hasn't changed much. And for many people, it no longer fits their needs.
Google Docs is a free online word processor that stores your work in the Google Cloud and allows you to collaborate with other Google users. It can be used wherever you have a data connection, it can also be used on your smartphone or tablet. And one of the best things is that it's free.
Whether you need to learn how to use Google Docs for work or because you're looking for a word processor that fits your life more than Word, we've got everything you need to know to become a Google Docs pro in this article.
What is Google Docs?
Google Docs is one of the many free online applications provided by Google as part of Google's "candy". It's free for anyone with a Google email account.
Google Docs is an online word processing system that was launched in 2006. While Google didn't explicitly state this, Docs was clearly designed as a response to Microsoft Word. Since it builds on what Microsoft has created, it solves many of the complaints customers have had with the processor.
One of the main differences between Docs and Word is that Docs is completely online. Therefore, Docs can work with all operating systems. Documents is cloud-based, so you don't use the storage space on your devices.
This also means that you can access your documents from anywhere in the world where you can connect. Gone are the days of a forgotten file ruining a presentation.
Google Docs was also built for collaboration. Multiple people can work on a document at the same time. They chat with each other as they work and keep track of the changes others are making in real time.
How open an account
Signing up for Google Docs is free. In fact, Google Docs and many other applications are free as part of the Google Apps collection. Other applications include Google Sheets (an online version of Microsoft Excel) and Google Slides (similar to Microsoft Powerpoint).
All these applications are freely accessible to anyone. You are automatically signed into a Google suite when you sign up for a Google email account. This is a very simple process which is also free.
Create a Google account
Here's a quick step-by-step guide to setting up a Google account and being able to access Google Docs.
1 pass: go to this web page. You will need to enter your first and last name and choose an email address. You will also have the option to associate your current email address with this account.
2 pass: so you will need to confirm this information before choosing a password. You will be asked to confirm this password before proceeding to the next page.
3 pass- you will be given the option to link a phone number to your account so that it can be used to verify logins in the future; this is optional.
After that, you will have full access to the Google Apps collection. The easiest way to access Google Docs is to go back to the Google home page.
In the upper right corner you will find links to Gmail, Google Images and an image with 9 gray dots.
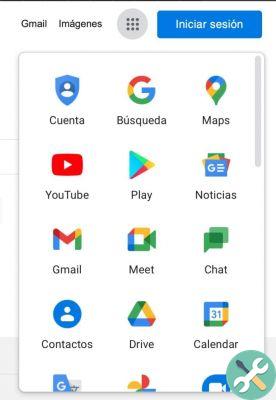
Clicking on these points will bring up a drop-down menu of all Google applications. Google Docs should be at the top of this list.
Alternatively, you can search for Google Docs and click on the first link.
Start a document
After opening Google Docs, you will see the main Docs screen. Here you'll have the option to open a blank document, choose from a variety of templates, and review any work you've previously created on this account.
Those familiar with Microsoft Word will notice that this splash screen is very similar to the latest edition of the word processor.
Create a blank document
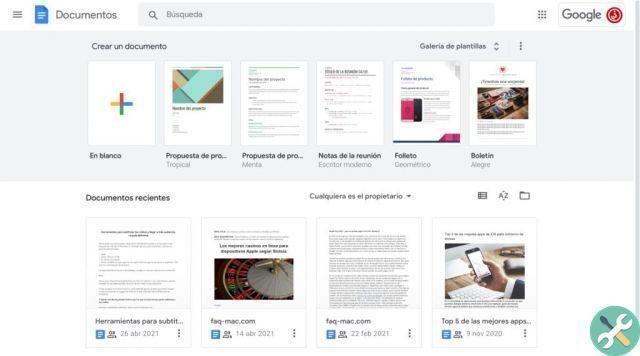
If you want to create a blank document, you will need to click on the multicolored plus sign (+) directly under “Create a document”.
This will open a new blank document. It will come unformatted and you can do whatever you want with it.
You can use this function to write a novel, a reportage, a guide on how to use Google Docs, whatever you like best.
Document templates
If you want to create a document with a lot of design, you might want to consider one of the templates created by the Google team. The home screen allows you to choose from six predefined templates.
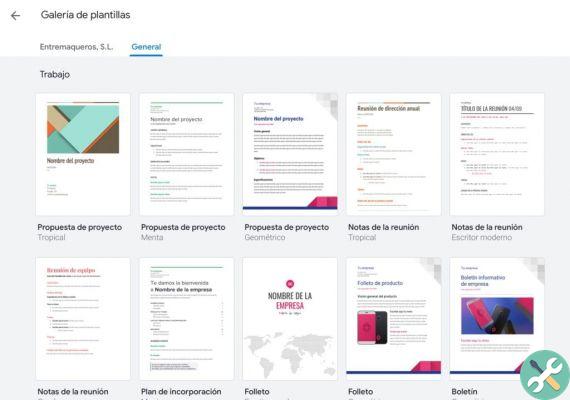
However, if you need more, you can click the button that says template gallery. Two new sets of templates will open: general templates and templates created by your company (if any).
Most won't have to worry about the second option. Unless you have a Google account linked to a school or workplace. If this is your case, there you will find the templates that the company wants to use for its communications and documents and you can send the ones you think are useful to other colleagues.
The General Templates section contains a few dozen templates created for different topics and writing tasks. These range from a school book report to a business plan.
Import a Microsoft Word document
To import a Microsoft Word document into Google Docs, you will first need to copy it to your Google Drive. This is a quick guide on how to do it.
Step 1: Open your Google Drive.
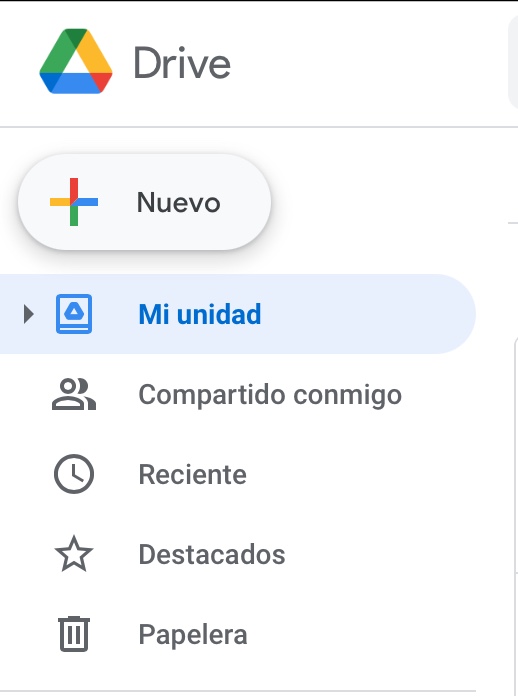
Step 2: There is a button on the left side of the screen that says "New". Click on it and select "Upload File" from the drop-down menu that appears.
Step 3: Find the Word file you want to upload. Click on it and then click the button at the bottom right of the popup that says Open.
Step 4: The file has been copied to Google Drive. Double click on the new file. When given the option to choose where to open it, click on Google Docs.
Spell checker
One of the main features that led to the success of Microsoft Word was its spell check function. Google Docs has this too. It also offers automatic corrections for common typos and predictive writing.

Our main complaint with Google Docs is that everything is much harder than necessary to find. It is very contradictory.
To find the spell checker in Google Docs, you should go to the menu at the top of the page (which starts with " Fillet "), On the right is the menu" Instruments ". Click and choose " Spelling and grammar ”From the drop-down menu (you can also use the shortcut CTRL + ALT + X).
Use Google Docs Offline (without Internet connection)
While there are many benefits to being able to store your documents exclusively online, there are times when we need to access them offline. It is very easy to set it up using Google Docs (Chrome is required).
It is important to note that you can only use this feature with one computer account. Therefore, if you have multiple accounts registered on the same computer, you will have to choose which one you want to be able to work with offline.
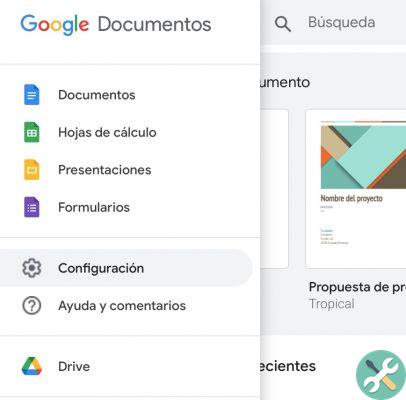
When you're on the Google Docs home page, hover over the hamburger menu (the three gray lines in the top left corner). When you click, a drop-down menu will appear, under the list of Google applications you will see Settings.
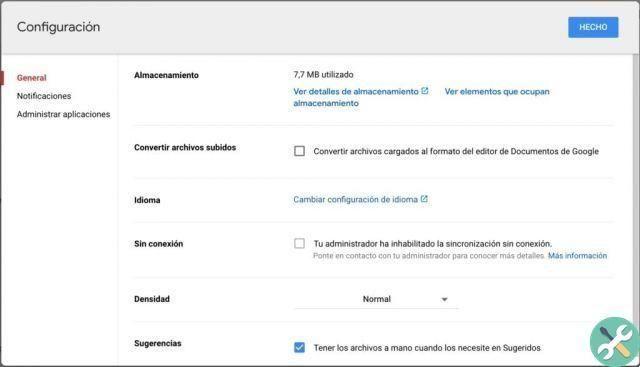
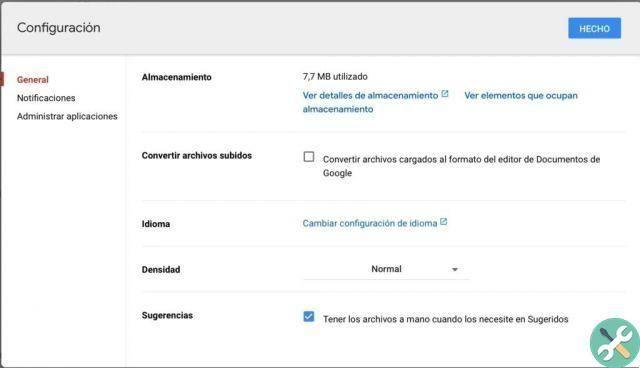
The configuration menu will present you 4 options, the third at the bottom is " Offline ". On the right side of this pop-up window, under “No connection”, there is a gray switch. Click on this switch and it will turn blue. When this toggle is blue, you will be able to access documents for this account while offline.
NOTE: : If it is not possible to activate the "Offline" job, it is because it must be activated first in the Unit Settings. Go to Google Drive and in its settings enable offline work.
Collaborate with other in Documents
Now we will talk about one of the most interesting and innovative features of Google Docs: its collaborative properties.
Unlike Word, Google Docs makes it easy to collaborate with others. You no longer have to send files back and forth. You don't have to wait for the other person to send you their changes before you can start working on the file.
Google Docs enables real-time collaboration between multiple people. Not only can you see people making changes to the document live, but you can also track the changes they are making, chat within the document, and work on your part of the document at the same time.
How to share documents
To start the collaboration, you'll need to create a document and share it with someone else. If you have trouble creating documents, please refer to the previous section.
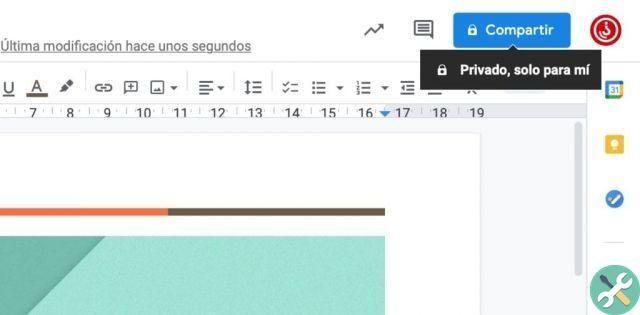
Once you have the document, you will need to click on the blue share button in the top right corner. It will be next to the circle representing your account (colors vary by account). This Share button will have a padlock or office block on top of a chain.
If you see a lock, it means that you have created a private document in your private account. Nobody will be able to see it if you don't give them permission.
If you have the office block, it means that you have created this document on a shared drive and anyone else with access to this unit can view the document.
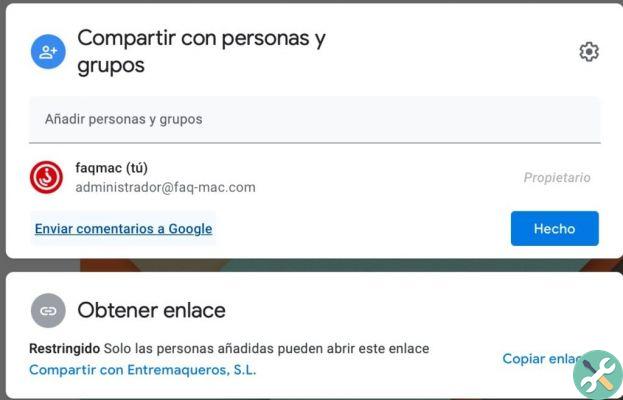
When you click the share button, you have two options: share with people or copy a link to share.
The “share with” option will allow you to enter the Gmail addresses of anyone who wishes to share this document. If you don't know their email address, you won't be able to share it with them this way.
The Copy Link option allows you to copy a link that will allow another user to access your document. You can paste this link wherever you want, anyone who clicks on it will have access to that work.
Recent changes
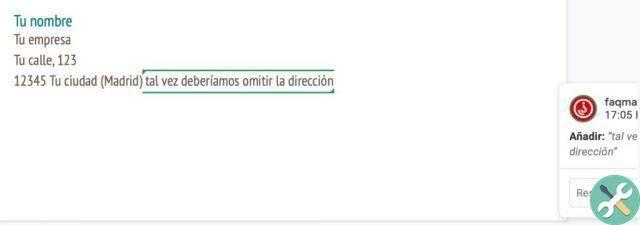
When you share your work with other people, there may come a time when you need to see what changes were made and who made them.

To do this, you need to click on the button above the font size editor. This bottom part will say something like “Last edited 3 minutes ago…”. However, if it passes it, it will say "open version history". Click this button and you will see a new type of overlay in the document.
This will allow you to see what changes were made and who made them. Each person will have their own color so that their changes are easy to trace.
Edit tips
One of the newer features of Google Docs is its Edit Suggestions feature.
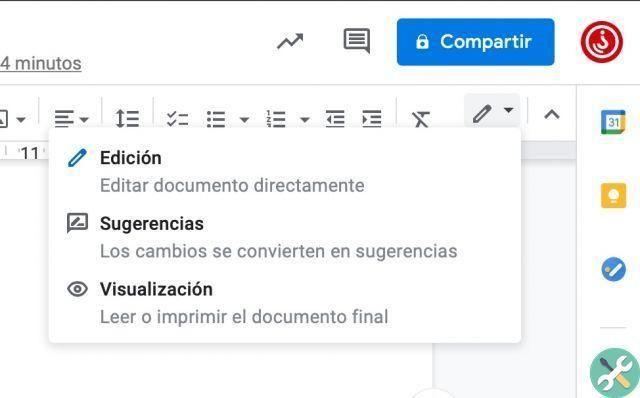
Previously, to suggest changes, you could use the comment function to add notes to the document. However, that didn't stop you from accidentally editing the text by clicking in the wrong place.
The new Tips feature allows the user to highlight and comment on the document without being able to edit it. These comments can be viewed in a separate overlay.
In this mode, click the "Edit" button directly below the Share button. A drop-down menu will appear, click on the “Suggestions” option and you are good to go.
If you use Chrome, you can also right click on the document, a menu will pop up. In the center of the menu, there will be an option for “Suggest changes” which will also put you in suggestion mode. (In Safari you will only see the Comment option)
Refinement Your Document.
Now let's take a look at some of the more basic skills you'll need to learn to put together good-looking documents in Google Docs. These are easy-to-use tools and features that let you start creating professional-looking documents the first time you use your word processor.
Text formatting
The text format bar is the part of Google Docs that most closely resembles Microsoft Word. This bar provides options for (working left to right)
- Undo the last action
- Repeat the last undo
- Spell checker
- Paste
- Select the text format (title, title 1, plain text, etc.)
- Choose the font
- Choose the font size
- Bold, italics, underline
- Change the font color
- Underline the text
- Create hyperlink
- Add a comment
- Insert image
- Align the body of the text
- Change the leading
- Add bullet points and number lists
- Decrease indent
- Increase indent
- Clear all formatting
Superscript and Subscript
Superscript and subscript are mainly used to represent formulas, chemical elements, large numbers and dates.
Many of these projects are automatically formulated in Google Docs. However, if the one you want to use is off this list, it's very easy to create.
Click on the " Inserisci ”In the top menu. In the drop-down menu select " Special character ". Click and a pop-up menu will open.
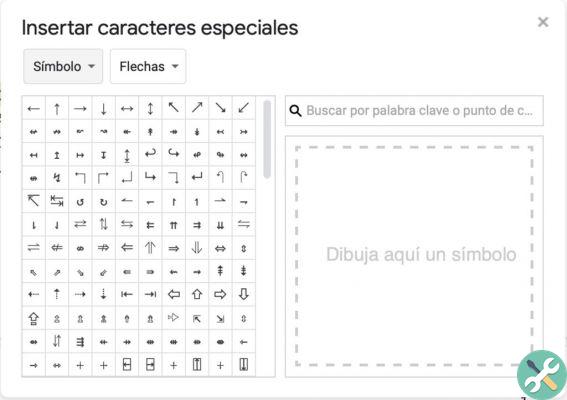
When this menu is open, you will see two more drop-down menus on selecting symbols. Click the menu on the right and scroll down until you find the superscript or subscript (the list is in alphabetical order). You can then choose which symbol you want to place and where. It will also give you the option to draw your own symbol.
Count words and pages
The most frustrating feature for us when typing in Google Docs is its word count system. This has been a functional feature in Microsoft Word since 1986, so why can't Google get it right nearly 40 years later?
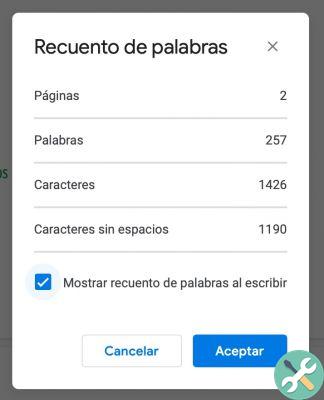
Things aren't as bad as they used to be. Google was missing a feature that would let you see the word count as you type. It now has this feature, but it stops working after 20.000 characters. This makes it really difficult to use if you're writing long pieces and need to stick to a specific number of words.
To see the word count, open the menu Instruments. Directly under Spelling and Grammar you will find the word count. A pop-up menu will open showing the number of words, characters and pages.
To see the word count permanently on the screen, check the “Show word count as you type” box.
Add page numbers
Adding page numbers is essential if you are printing your document or want to collaborate with someone else on the document. Page numbers not only help keep pages tidy, they are also a great way to refer to a part of your document.
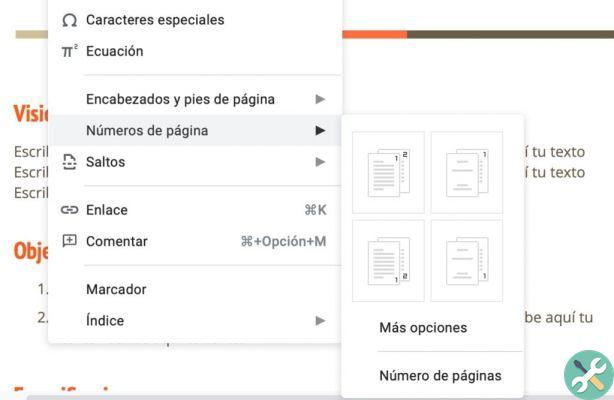
Go to the menu Inserisci and click. The XNUMXth bottom option (under the headers and footnotes) in the menu is Numbers of page . You can then choose where on the page you want to place the numbers and which page of the document you want page 1 to be.
Margin control
The margin editing system in Google Docs is almost identical to the Word system. At the top of the document and below the menu bar, you'll see a ruler with cursors. To change the margins, move the sliders back and forth.
bleeding

The indent is used to symbolize the beginning of a paragraph in traditional text formats. There are two simple ways to indent paragraphs with Google Docs. There is also another function that does all the work automatically.
First of all, you can indent a paragraph by pressing the tab key on your keyboard. This will indent the paragraph to the right (unless you have the text right aligned).
You can also use the indent decrease and increase buttons, which are the last two buttons on the text formatting menu.
Once you have indented 3-5 paragraphs in a row in Google Docs, the software will automatically begin indenting for you.
Add text boxes
Text boxes are a great way to add emotion to a document or to create a clear area of focus for your readers. The bad news is that adding them to a Google Doc isn't very easy.
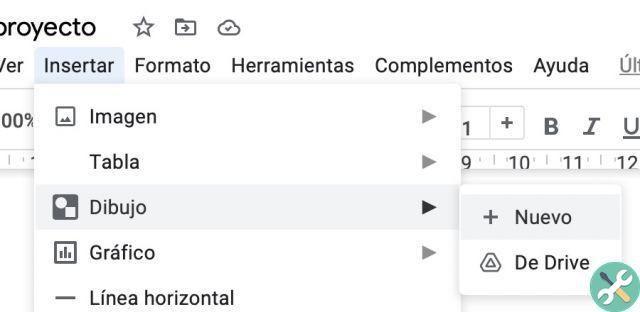
Open the drop-down menu Inserisci and click on the third option: " insert drawing ". Choose the option New and when the pop-up menu appears, choose the option text box from menu (the penultimate option: a T in a box).

You can then fill in the text box before hitting Save. The text box will appear where the cursor was.
Add a Table of Contents
Before inserting a table of contents, you need to make sure that everything you want to include in it is some sort of header. If not, it will not appear in the list.
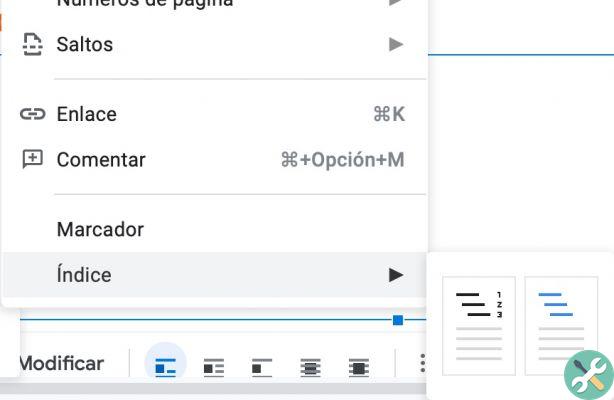
Once this problem is fixed, open the menu Inserisci and choose the last option (Index). You will have to choose between a content page that includes page numbers or one that creates hyperlinks to each section or references.
The text box will appear where the cursor was, but you can drag it to a different part of the article without affecting its formatting.
Export a document from Google Docs
Once your document is done, you may want to export it. It's worth noting that Google Docs offers in-app printing and sharing.
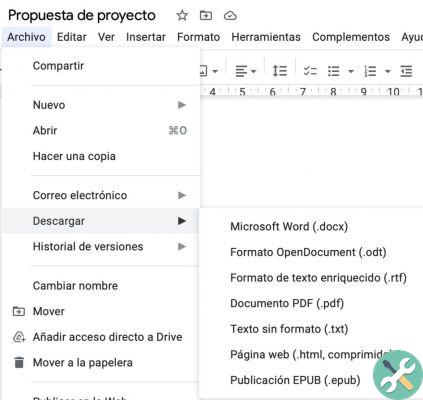
If you choose to export the document, open the drop-down menu Fillet. The sixth option below " Download ”Will allow you to export the document to your hard drive or any other storage drive.
You will be able to choose the type of file in which you want to download the document; We recommend that you download it as a PDF or Microsoft Word file.
The best extensions from Google Documents
Google Docs plug-ins are user-created content designed to enhance the functionality of Google Docs.
Below, we've created a list of 5 of our favorite add-ons. We have chosen a combination of features that fix bugs in Google Docs and make our life easier.
To install add-ons, click the Add- ons drop-down menu, a pop-up window will open allowing you to search through all available add-ons. Most of the plugins are free.
1 Outwrite / formerly Grammarly
No spell checker will be perfect; however, we found that the combined use of Google Docs and Grammarly's built-in spell checker is the perfect combination.
Grammarly is still being tested and isn't perfect. But it's by far one of the best spelling and grammar check plugins out there.
Grammarly works similar to the Google Docs spell checker. Highlight spelling errors by underlining in red and highlighting weak writing and bad grammar with a blue underline. It also has a pop-up side menu that allows you to see all the problems you have encountered and the clarity rating of the work.
Grammarly has free service and premium service. However, the premium service offers little more than the opportunity to support application developers.
This is a plugin that both students and professionals will find useful. Grammarly is even developing a tool that lets you know what kind of emotions you are showing in your writing. This is parts


![Google also wants your Apple News [Updated] [2]](/images/posts/943dc0d8f28fcc4bc16fa30ed6d71f6a-0.jpg)


![Apple Vice Presidents Talk About Development of M1 for Mac [Updated]](/images/posts/c6254b668e5b3884d6b6338ccb8a02ff-0.jpg)