


Telnet has played an important role in institutions that manage large databases, currently it can be accessed via local web interfaces. It is considered a practical protocol for servers and network administrators.
Find out how to activate the Telnet client in Windows
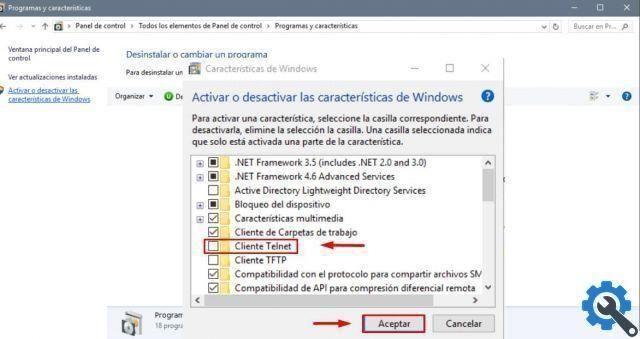
This tool is generally not activated or enabled on Windows systems, it must be configured and you can get them if you follow the following steps:
First you need to enter "Start" select the option "Pannello di controllo" at that moment you have to click on "Programs" and select "Programs and features". So you have to select " Activate or deactivate Windows features ".

A window will appear with a list of options, you need to select where it says “client telnet” to activate the option and finally click on "Accept".
It is a simple procedure, in turn, if you want to check if the procedure you performed worked, you can test the connection between the computers. You just need to get the server name and IP to be able to perform the connection test.
Connect the computer to the Multi-box network
Also, to connect the computer to the Multi-box network, you need to follow some steps, initially you need to enter the Windows commands, to access these you need to select "Start" and click "Run" a window will open where you have to write "Cmd" and select the option "Accept".
A black window will then appear in which you need to write "Ipconfig / all" to obtain in this way the name and the IP of the server. Also, consider keeping the notes of the data that appear there handy, as they will be requested on several occasions.
After this procedure, the connection tests will start, write “telnet IP 3050” and the IP data will be those obtained previously. Similarly, if the connection fails, it could be due to a security program, in this case it is convenient to make a configuration so that they work correctly.
At that point the screen will restart, these are the procedures you need to perform to perform the connection test.
Steps to activate the Telnet client in different versions of Windows

In order to configure the telnet client in Windows 7 you have to go to start, control panel, programs and finally select "Programs and features". Then you need to click on Turn Windows features on or off.
In addition, various options will appear, you need to mark the telnet client and press the word accepts. The connection to the server has finally been activated.
Also, to enable the telnet client in Windows 8, you need to follow the steps mentioned above, as they are similar. Likewise, an error message may appear.
In Windows 10 it's included also the option telnet client but disabled, you have to go to start and follow the above procedures until you reach the option to activate the telnet client and click OK.
Once these steps are complete, you need to enter start, run, to access the command window. In this blue box it is necessary to follow a series of instructions to finally activate the telnet client.
You must write "Ipconfig / all" without the quotes and press enter, so that later you can get the server name or host name and its IP. It is recommended to keep this data handy, as you will need it repeatedly during the procedure.
You may also be interested, how many versions of Windows 10 are there and which is the best?
among other related topics. Taking into account that on this website you will be able to obtain a wide range of technological contents, of great relevance and usefulness in our daily life.


