


Automatically lock the screen
You can automatically lock the screen in Windows very easily. For this you need to access certain configuration options in the Control Panel.
- In particular, you should look for the “Appearance and Personalization” options. There, look for the "Personalization" section.
- At the bottom you will find the option “Screen Saver”, click on this option to change the settings.
- If you can't find it in the above way, simply search for “Screen Saver” in the Control Panel search engine and it will appear.
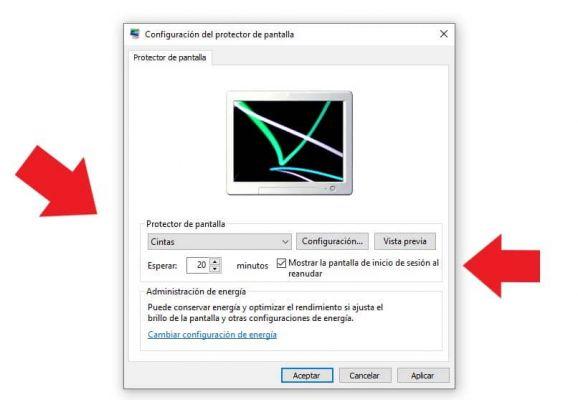
- The screensaver menu will pop up, configure the one you like best. The important thing in this case is to determine the moment when the protector appears.
- In the option "Wait" enter the minutes or hour that seems most appropriate for the screen lock.
- It is very important to enable the option "Show login screen for shooting". Enabling this option will ensure that you set the lock so that you need to enter a password. You can configure the password as we show you below.
- After making all the above settings, click "OK". In this way the automatic screen lock will have been configured correctly in Windows. Also, please note that you can set your photos in the Windows 10 screensaver during setup.
Lock the Windows 10 screen
You may not know this, but there is a very easy way to lock your computer screen. To do this, you just have to press the key Windows configuration + L, after doing that, the screen will be locked immediately.
Clearly, it's best to use this feature when you have an active password on your computer. If you don't know how to put it, please read the information shown first where we show you how to do it.
It's arguably one of the quickest and easiest ways to lock the screen on a Windows 10 PC, although it's relatively similar to changing the screen sleep time in Windows.
Create a password to lock the screen in Windows 10
The most logical option in case you want to lock your computer or screen is to use the Windows account system. The classic Windows account system can be efficient if you like block information on your computer when you are not there.

- To use this method, you just need to go to PC Settings in the Start menu and Accounts section. There, look for the submenu "Access options" and click "Password", now click "Add".
- You will need to provide a password and then click on "Forward" and then on "Finish". This way you can log out when you stop using your computer and protect your information. Note that there is the possibility to hide the show password button on the Windows 10 login screen, which is useful for the configuration that we will do later.
Turn off the screen after a few minutes
If you want that the monitor turns off when you stop using your computer after a few minutes, read on. This configuration can be done via the options in the Control Panel, go to this section of Windows to get started.
- Once in the Control Panel, look for the option "Power options". Select the currently active plan and click "Change plan settings".
- You should look for the option “Turn off screen”, here select the time you want to pass before the screen turns off. This time it will take effect after you stop using your computer.
- Remember that if you have a laptop, you need to configure both the battery and the power connection. Here you can also configure the options “Sleep” which are usually very useful for saving energy.


