


In this case, you have to download a fairly simple and light application called ”IrfanView“. This is a free tool available in various application stores such as Play Store, among others. Furthermore, the option has a configuration panel which can host it as direct access to have it at hand at any time.
The Windows 10 operating system also allows you to customize and change the mouse cursor warmth to make the cursor more visible.
Guide to using the mouse cursor in screenshots in Windows 10
Using the mouse cursor in the screenshot in Windows 10 is really easy when you have the support you need. But you still have to follow some steps like:
Download and install IrfanView
Even if it seems a bit cliché, the first thing to do is go to one of the application stores and place " InfranView ". In general, the App is positioned in the first search places.
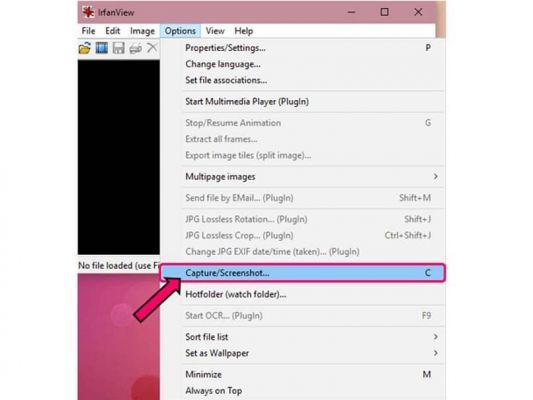
When you enter the profile, you need to press the button that says " Install “, Wait for the upload process and then run on your computer. For synchronization it is necessary to follow the following path: " Options> Captures / Screenshots> Desktop area - current monitor ". It is very important to clarify that during the procedure you will be asked for permission to access certain information.
How the App works
To use the mouse cursor in the screenshot in Windows 10 you need to double-click the tool shortcut. Immediately, the screen will freeze and a pop-up window will appear with the click.
In the worksheet, users have the opportunity to adapt or add elements to the capture with text boxes or figures. An important point is that the actual cursor size will not appear in the shot, being a flaw for some people. However, the quality or resolution is one of the best on the whole web.
Are there any other tools?
The answer is yes, there are other applications that can do a similar job, a clear example is "Greenshot". It is a function that helps to capture the cursor on a computer screen.
In addition to this program, there are many others compatible with Windows which, although they do not use the mouse to take a screenshot, have the same function.
A very good attribute is that allows you to move the cursor once it is frozen before storing, so it allows for a good adaptation. Furthermore, in this way the user has greater freedom of modification.
It allows you to define colors, elements and texts to capture, just like any other platform. Except that the resolution of the image is not as good as it looks, which is a rather negative aspect but which can be corrected with other tools.
While applying screencasting allows the recording of a short video whose duration does not exceed 10 minutes. Likewise, it displays the cursor in its actual size. Downloading is very simple, the only thing you need to have is a good internet connection, otherwise it's a problem that means waiting.

Advantages of the mouse cursor in the screenshot in Windows 10
There are many advantages over mouse capture, but the most important is to record brevi video on your computer for tutorials or processes. However, it is also very useful for editors or journalists.
For better pointer operation it is important to try changing or increasing the speed of the mouse pointer.
Being able to use the mouse cursor in a screenshot in Windows 10 allows you to have a memory or take information that cannot be copied in the traditional way.
And also useful for creating presentations with original screen photos. Plus, it's a really lightweight tool, meaning it won't take up much space on your computer or laptop. It can be found very easily on different application platforms.
Although the mouse cursor allows you to take screenshots quickly, there are programs compatible with the Windows 10 operating system that allow you to do so, as an example of these programs we have Screen Snip.


