


Photoshop is a tool that allows us to perform multiple tasks and knowing it is fascinating, being able to make all kinds of changes, create images and even Animated GIFs quickly and easily.
This tool gives us superior quality in image editing and we can get it totally free for personal or professional use. Supported on Windows and iOS, we find it in a portable version on some websites and it allows us to carry this application on a Pendrive to use it on any computer without the need for installation.
How to change the resolution of an image in Photoshop?
- To start we have to open the program on our PC or install Photoshop on its official website.
- Inside we select the image that we will use to change its resolution.
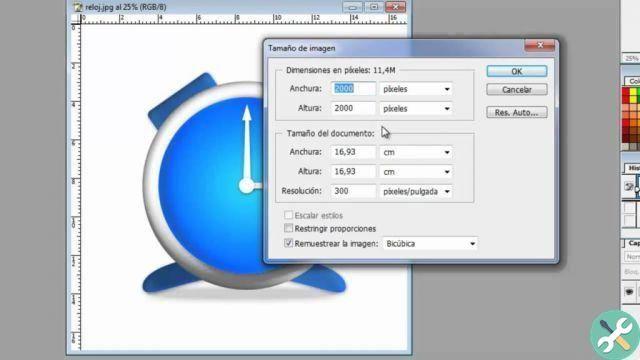
- When the image is open we will use the menu "Image" a which we access from the bottom of our program.
- In this menu, we press the option "Image size" and choose the size we would like this image to be.
- Important: when we change the resolution of an image and we have the exact width and height measurements, they can position it, but if they know the height, but not the width, they can use the option “Scala”.
- This image size tool also allows us to measure in inches, centimeters, pixels.
- When we enter the correct dimensions in the image, we proceed to press OK to save the changes to the dimensions in the image.
How to change the resolution of an image in Photoshop?
- In the menu "Image" e "Image size" we will find the option to change the resolution.
- Note that the resolution of the image will also change the size of the image so that they are level with each other.
- Once you have made the change, press OK and the changes will appear in the image.
In this way, step by step, we will learn how to make changes in image resolution and size that we want as professionals. Also with this fantastic tool we can create and save an image in Photoshop without losing quality.

How to change the quality of an image in Photoshop?
This point is important in case the image quality is not lost when it is saved on our computer.
How many times are images smaller than 1024 and which are still of poor quality, because perhaps those images have been retouched and changed their original quality.
In order for this not to happen when your images are saved, you need to follow these simple steps which will teach you how to change the resolution and size of your Photoshop-edited images.
- Click Save As… in the menu "File".
- It opens a small window where it makes us evaluate the image quality with a number and based on these it also shows the weight in KB of your image in question.
- You must observe that your image has an acceptable resolution but the weight of your image is not excessive.
- The weight can affect the fact that when you want to upload it to a social network, send it by post or via a WhatsApp chat or any other platform, it prevents us from doing it because our image file is very heavy.
We hope you enjoyed this tutorial and helped change the image size and resolution with Photoshop to a higher quality and in a very professional way. There are also others alternatives to Adobe Photoshop to edit images if the program cannot be installed. Don't forget we have other articles on Photoshop that you might find useful.
TagsPhotoshop


