Many times when we see our computer starts to spoil and it becomes slower, we immediately think about buying a new RAM memory. However, all these drawbacks can be solved with virtual memory of Windows, so today we will show you what it consists of.
Likewise, we will show you in a few simple steps how you can configure or increase virtual memory in Windows 10. So without further ado, read on and make the most of your computer's virtual memory.
What is Windows Virtual Memory?
Many people are unaware of the existence of the virtual memory in Windows, therefore, when Windows crashes, they only think about replacing the RAM memory. But this is not always the solution, because your computer has virtual memory, which can be activated, when the RAM has no storage capacity.
In other words, virtual memory is one storage space on the hard disk that we can free, where the data that no longer enters the RAM is stored. Therefore, knowing how to adjust virtual memory is very important to ensure that we always have a perfectly working computer.
Fortunately, Windows 10 automatically manages virtual memory space, however you can also change it. This way, you can guarantee more space than virtual storage and, therefore, better performance on your computer.
In general, it is recommended that the virtual memory is double the RAM, so if the RAM is 4 GB, the virtual memory can be 8 GB. But configuring or increasing virtual memory in Windows 10 we will explain later.
On the other hand, despite all the advantages which has virtual memory, you should also know that it has some disadvantages, including:
- Consume some resources on the hard drive, so you need to know how many GB will be allocated to virtual memory.
- Sometimes your computer can be slower if you have to constantly go to the hard drive to get some information.
- Finally, although the virtual memory value is high, it will never be better than adding a new one RAM the computer is necessary.
Knowing this, it's time you knew how configure virtual memory in the next step.
Steps to configure or increase virtual memory in Windows 10
Now that you know what it is virtual memory in Windows 10, we will explain in detail the steps you need to follow to increase or configure it. Remember that as we said before, by default your computer carries an assigned virtual memory value, however, you can change it by doing the following:
- Log in Windows 10.
- Once inside, press the "Windows and X" keys at the same time.
- Several options will appear and you will select “System”.
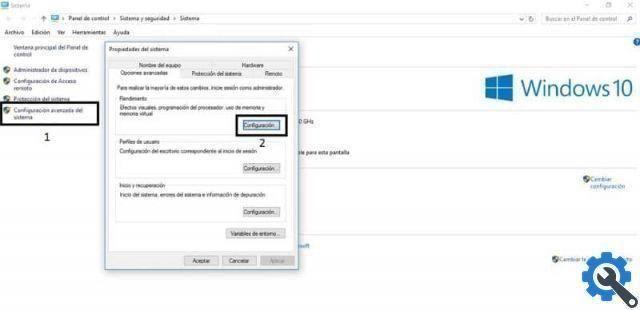
- Then another window will open and you will need to click on “Advanced System Settings”.
- Then click "Advanced options" and then in the performance section select "Settings".
- You will see a new pop-up window and mark “Advanced options” and in the virtual memory section select “Change”.
- In the information displayed deselect the “Automatically manage paging file size for all drives” box.
- Then go to the “Custom Size” option and under “Initial Size” you will place the value that appears recommended. So, in "Maximum size" enter twice the recommended size value.
- Finally, click "Set", then "OK" and that's it.
After following these steps correctly, you will have increased the virtual memory in Windows 10 on your computer. As you may have noticed, it is a very procedure quick and easy, so you don't need to be a computer or technology expert.
So, if you have already managed to configuration or increase virtual memory in Windows 10, don't forget to clean, optimize and speed up my Windows 10 PC frequently to avoid slowing down the machine.