


Another very important aspect is knowing how to manage funds. If you are still learning about this tool, we recommend that you learn more about how to change the background of a photo with Photoshop CC and also erase the background of a photo with Photoshop CC.
How can you create a full or partial blur effect in Photoshop CC?
Blurring a photo or image with Photoshop CC is very simple, it only takes a few steps to blur completely the photo, as well as to do it partially, it will all depend on the effect you want. Without further ado we will show you below:
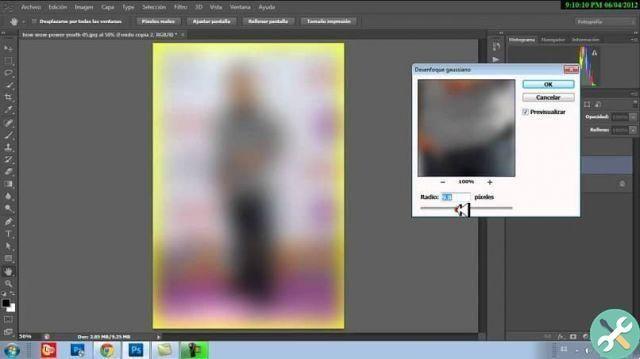
How to completely blur the photo?
- The first thing to do is open the photo and click on it,
- Then, open the tab "Filters" and click "Blur",
- In the submenu, click Gaussian blur,
- Place your favorite pixel to blur, then click Ok.
How to partially blur the photo?
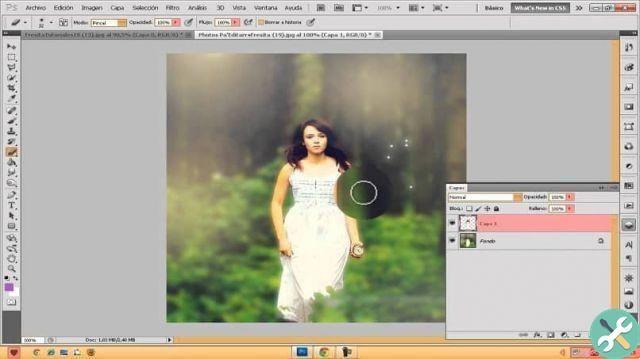
First method to partially blur the photo:
- One way to partially blur the image or only its background, is to blur it completely, but you have to duplicate your layer or copy it to work the partial blur, this is done by pressing the tasti Ctrl + J or by dragging it to create a new layer.
- Open the "Filters" tab and click on "Blur".
- In the submenu click on "Gaussian Blur".
- Once open, apply the filter percentage you prefer to get the blur, click on Ok,
- Choose yours within the photograph target point, i.e. the person (s), faces, objects or a specific space, or what you like to focus on to improve it, just go to the tool "Eraser" located on the left side of Photoshop CC to proceed with the deletion,
- To do this you need to go to the tab "Brush mode", there you choose from the range of options the brush size that best suits what you want to erase, if the image is a little bulky or thick you may need a thicker brush,
- Then with the Alt key you will make the corresponding zoom towards the people, objects or space of the image you want to delete,
- With your brush proceed to erase all your destination point; choose the size of the brush which helps you to erase the finer details, as well as their edges or outlines.
Second method for blur effect in Photoshop CC in photography:
- On a copy of the layer, go to the toolbar and choose the quick selection item, apply it on the destination point you want to highlight or separate it because you don't want to blur it, now proceed to outline the outline or edges with the mouse cursor from the destination point,
- When finished, press the button "Select and apply mask".
- To refine some edge details, go to the tool "brush" and draws the outline or edges that lie outside the target point.
- Go to Send to:, select "New layer with layer mask" and click on «Ok»,
- Click on the mask, in this way you will see that it will separate or isolate your target point from the rest of the photograph, the background of the photograph will still be there but it will appear hidden,
- If you want to see the background again, click on the box "Background",
- Then, go to the «Filters» tab, click on «Blur»,
- In the submenu click on "Gaussian Blur",
- Apply the filter pixel of your choice to get the desired blur in the background, the lower the layer you choose, the sharper the outline will be.
With Photoshop CC you will have many options to perfect your photos to the maximum. However, to get a optimal blur effect, total or partial; smoothly apply these steps on how to make a blur effect in Photoshop CC.
TagsPhotoshop


