


Microsoft Publisher is known as a company-owned program Microsoft. It is designed to aid in the creation of different visual compositions. Alii can create Calendar, diplomas, brochures, creative banners and newsletters.
Start by choosing a template
- To get started from here, you need to enter the Publisher program and once inside. You have to click on the Integrated button and after that, go to the option "Greeting cards".
- When did you spot this option, you have to scroll down to the ones that are pre-designed, regarding this topic. Once you have found one that you find pleasant, you must proceed to click on said model to have a preview and then be satisfied with everything it can offer you.
- Once you have found the template you like or the one you have created, click on the button "Customize" and then "Options", there you can make any changes to your design.
- Once I'm done, you just have to hit the Create button and everything will be ready for you.
How to customize the cards
Start by making changes within the design
Any changes made within the publication it can affect shape and size. Here we will leave you a list of things you can add that, in one way or another, would affect the look of your text in the final result.
- To start, you can do a little test with the different color combinations, which you can find in the tab "Page design", when you click there, you can find a wide color palette. By hovering your mouse over these combinations, they will instantly be reflected in the look of your greeting card.
- Now you need to try out the different types of fonts, you can do it by positioning yourself in the tab "Page design" and then locating you in the section "Characters", there you will see everything that the program offers you and you can try until you find the one that suits you, you like it.
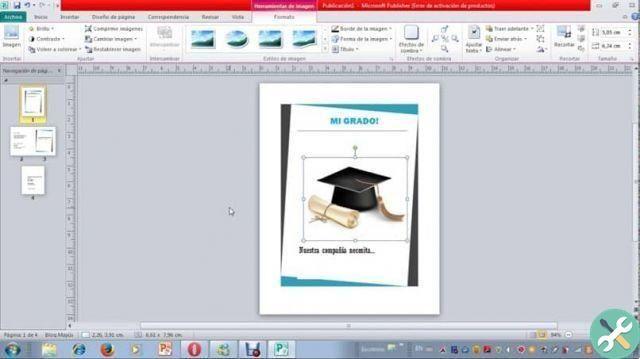
How to use images
One of the most important factors in this type of paper are the images. Within this type of template, there is an easy and dynamic way to insert them which we explain below:
- Start by right-clicking on the image that is inside the marker at the location, then click on the option "Change image" and then go to the option "Change image"
- Next, go to the dialog box and after that, start inserting said image. Proceed by pressing the "examine" button to search for these images in yours PC or, failing that, within the local network. Likewise, Office.com simplifies the search from Bing.
- Repeat this process depending on the number of images that will go into the publication.

Make proper use of text editing
Text is one of the most important sections of your card. Based on this, you can choose a predefined text that you can replace or change in any way you like. To access this option, you need to follow the instructions below:
- Start by selecting the text of the indicator found on the map within the chart paper. And once there, proceed to write your message.
- Likewise, you can access the "Insert" section, then click on the option "Draw Text Box".
- Then you need to select where you want the text to be and click. Once everything is ready, you just have to write the text.
When the text is ready, you can edit and position it however you want using the Home tab. There you will see the different text editing options available. It should be noted that you can also create business cards so that you can show the world what you want to share.
TagsEditore


