


You will also manage to have 2 different operating systems ; one on the local drive C and another on the other drive where you create the partition, allowing you to store multiple files, create backups and save sensitive or personal files and even games.
A partition is a division that is performed on the storage disk in information on a hard drive. Divide your hard drive space into parts, so you can reserve multiple files. Even if you think it's a delicate matter, Windows 10 makes it easy. Find out how to create it in this guide that we present below.
A partition in Windows 10
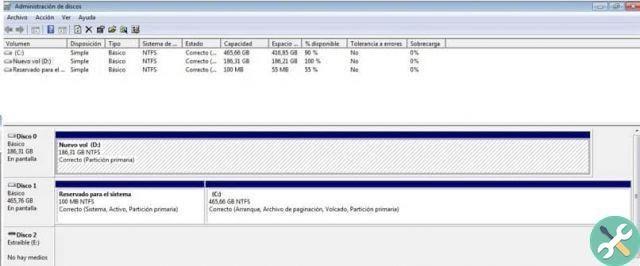
It is done by right-clicking on start and selecting computer management; In the window that opens on the left, select Disk Management, the disks your computer has will appear.
There is the reserved one To the system, which is where Windows 10 is in this case (this isn't reflected on the computer, so it's not visible) and you'll find the c disk, which is where your operating system is located.
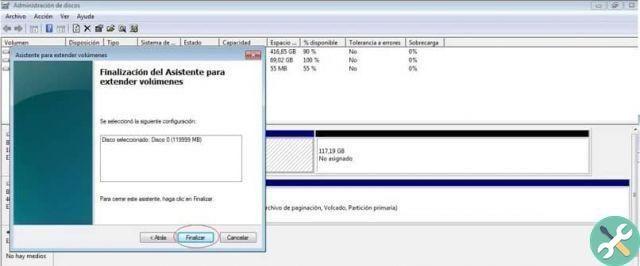
Next go to the local drive it has enough space in so you can create the partition; right-click on the disk where you want to create the partition and select Shrink Volume; In the window that appears, it will ask you for the amount of space to use, in MB only.
For example, if you want partition the local disk of 2 GB, the result converted to "megabyte" is 2048 MB; Put this amount where they ask you the size of the space you want to reduce in MB; you shouldn't put the dot in this amount. The field you can adjust is the size of the space; Click "Reduce" and the created disc will be presented.
Some IT professionals who have to manage hard or local drives have seen that the application, AOMEI Partition Assistant Pro it makes their life easier by being able to partition the disk quicker and can also change the drive letter if you want to learn how to use it and change your hard drive letter, this link is for you.
Partition created in Windows 10
Then it will show you the partition and in the part top you will notice a thick black line and the amount of GB you entered, as well as the unallocated word.
To solve this problem, right click on it and select a new simple volume, click on the next dialog that will appear and in the section on specifying the size of the simple volume in MB leave it as is.
Then give next and on the volume label put the name you want the local disk to have, then press forward and finish. Therefore, the computer will recognize the local disk created with the partition we created.
The created partition does not appear
It may be that you cannot see it along with other drives and prevent you from accessing it. Could be there be another drive with the same letter with you created the partition. Changing the letter can solve this problem. To do this, right-click on Start, in Disk Management; click on the partition you don't see.
Then press change in the window that appears; select a different letter in the For section assign the drive letter, click Next and press accept. Observe in Start, in explore files, in the tab this computer, that the partition is visible. If this doesn't work for you, your external hard drive may be damaged for some reason and your PC won't detect it; If so and you have come here with that problem, you can read this article which solves it in just a few steps.
In conclusion, creating a partition in Windows 10 will ensure you preserve important and delicate files, you will also be able to protect them from the contagion of viruses. Doing so will allow you to have 2 operating systems on your computer. These partitions work independently, generating greater protection for what you will be storing there. Now, if for some reason you need to re-merge the disk that is partitioned and leave it as new; you can do it, we fixed it a while ago and we leave it here for you to take a look at.


