


He has provided us with products and services that have greatly aided our company's development. Being constantly evolving and updating your services never ceases to surprise us.
One of the services that has undoubtedly helped a lot in the development of IT documentation is Microsoft Office. This offers us a gallery of programs aimed at creating and editing documents.
These tools they are currently the most used by the average user for the compilation of their documents. One such program that has had since its inception and continues to be very successful today is Microsoft Word.
How to create macros using Microsoft Word?
Word is a computer oriented program to word processing, with this you can create textual information files. It has several functions, including: change the size of the margins, insert different headers and footers, insert frames, modify upper or lower case texts, etc. With which we can control the quality of our work.
Over time it has updated and perfected each of its functions, it currently has tools that control every part of this program. Which gives us the ability to interact easily with its interface.
If we know how to use each of these tools, we will be able to create documents in a much more practical way than usual. One of the most amazing features is the use of macros.
With this function we can automate the actions we do on a regular basis. To know a little more about this topic we have prepared this article in which we will explain all the steps that must be followed to use macros in Word.
Steps to create macros using Word
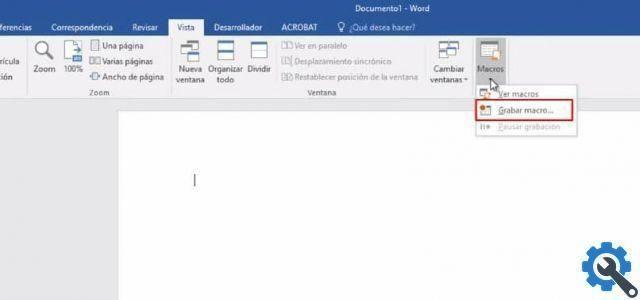
The first step to create a macro is to open the Word program, once open we go to the options in the top bar and select the last one, "View". The options tab will appear and we select the option on the right “Macro”.
Next, we choose "Record macro" a window will open, in this we place the name of our macro in the bar "Macro name". We recommend leaving it in .dotm, this way it will be available for use in all of our documents.
Finally, we can insert one "Description" down and do click su "OK", with this action our macro will start recording. Now we can start carrying out the actions we want to automate.
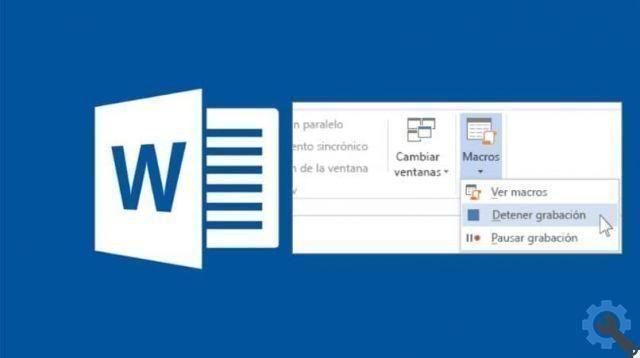
It is important to note that you cannot use the mouse within the sheet while recording a macro. Therefore, we need to know the commands and perform actions from the top menu. To stop recording, click on the box in the bottom bar.
Steps to run a macro using Microsoft Word
Once we have created our macro to run it, we need to add it to the toolbar located at the top left of the screen. This is to have it at hand and be able to use it whenever we want.
To perform this action we need to select the option "File" in the upper left part, there we select the last alternative "Options". The window will open “Word Options” and we will select "Quick Access Toolbar".
Let's click on the first option "Available commands" and select “Macro”, under this we will see all the macros we have created and we will mark the one we just created. Now let's click on the option "Add" located in the center of the window.
With this action it will be added to the box on the right side, which means it is already in the Quick Access Toolbar. If you want to change it, select it in the box on the right, click on "Edit" down.
We will get a box of symbols, here we can choose the icon that we want to represent our macro in the toolbar. Then we click "Accept" and again on Accept.
This way, the macro we create will automatically be added to our toolbar. Now we can run it whenever we want, simply by clicking on the icon that will be run.


