


It should be noted that this tool is of great importance today as it helps in branding a website. It also generates the site's identity and helps your visitors remember your brand. There are several ways to insert or edit a Favicon in WordPress, however, here we will mention 2 methods, which will be very useful and simple.
- Method 1: upload or edit a Favicon via the WordPress customizer.
- Method 2: upload or edit a Favicon via custom code in header.php.
Now we will see step by step how to use each of these methods in an easy way and know how to enter or edit a Favicon on a web from Google Chrome.
How to edit a Favicon through the WordPress customizer
Using the WordPress customizer for add favicon DON'T è only the most recommended method, but also the simplest. However, you must keep in mind that if you want to use this method, you must have the latest version of WordPress, at least from version 4.3 onwards.
Well, without further ado let's see step by step how to load or modify a Favicon through the WordPress customizer.
- First of all, you will need to be registered in the WordPress content management platform.
- So you need to have your account active and find yourself, specifically, in the administrative part of WordPress.
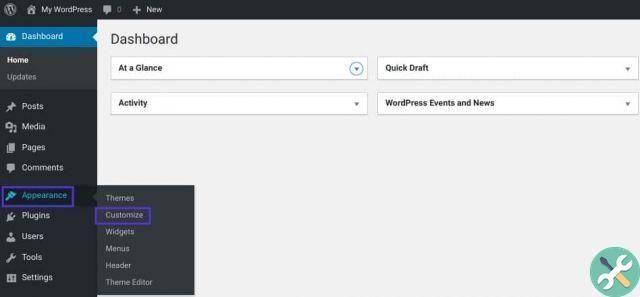
- Next you need to select the "Appearance" icon located at the top left of the screen in the WordPress dashboard.
- Now a window will appear with another set of options. Within which you will find one in particular with the name of "customize for" on which you will have to click to enter what is known as a customizer.
- Once inside the WordPress customizer, you will be able to see a new window identified as "site identity".
- At this point a new submenu will appear which will provide the option to load the site icon. We remind you that the image you can upload from your Favicon must be at least 512 x 512 pixels.
- After uploading the image of your preference, you need to click on save the changes to your configuration. Finally you should be able to see yours favicon loaded in your website tab.
How to modify a Favicon via custom code in header.php
Of all the methods presented so far, this one corresponds to the most advanced and complex of all, yet it is very efficient and fast. Well, let's see below step by step how to upload or edit a Favicon via custom code in header.php.
- The first thing you need to do is enter the WordPress page and locate the icon with the name of the aspect you need to click on the WordPress home page.
- After that, a new tab with different icons will appear, here you will have to locate and select by clicking on the icon with the name “theme editor”.
- Then within the theme editor, you will see a list of your files WordPress on the right side, here you have to select and click on the “theme header” icon.
- Here you will have a section where you can make changes to the theme by entering the code required for this purpose.
- Now at this point you will have to replace the address of the web page shown with the URL of your website and the configuration will be ready. Here you should finally have your Favicon loaded into your webpage tab, which you can verify by updating and updating your changes.
In conclusion, consider that the WordPress Favicon is an important feature of any website. Therefore, you'd be missing out on a great branding opportunity if you didn't have yours.
As a result, we hope you were able to learn how to insert or change easily a Favicon in WordPress. For more similar topics, be sure to visit our applications blog.
TagsWordPress


