


It is no secret that this operating system is loaded with processes that may seem useless or annoying while performing other tasks. Regardless of how many versions of Windows 10 there are and which one is best, at some point you will want to go through this process.
As on the other hand, they may seem essential for the proper functioning of applications or programs that need them.
The location of Windows 10 is among many, an application that it may seem as useful as it is unnecessary at any moment.
There are applications, for example, that need the localization process to function properly or perform their task correctly.
However, the applications that use this process are specific, so the user often sees it as a hindrance in terms of performance of your computer and chooses to disable it.
While turning it on or off is relatively simple, many people have no idea how to do it, either due to their inexperience with computers or for any other reason. Whatever it is, this guide will help you learn how to turn location on or off in Windows 10.
This can be done in two ways: generally and for one or more specific applications.

Enable or disable for all applications
To access the Windows 10 location settings, both to activate it and to deactivate it, as a first step we need to access the start menu. Remember to fix Windows 10 boot menu stuck if the case occurs.
A button made up of four squares joined together representing the Windows symbol, which you probably already know.
After clicking on start and viewing the menu, we will proceed to choosing the "Settings" option which you see in the lower left part of the menu.
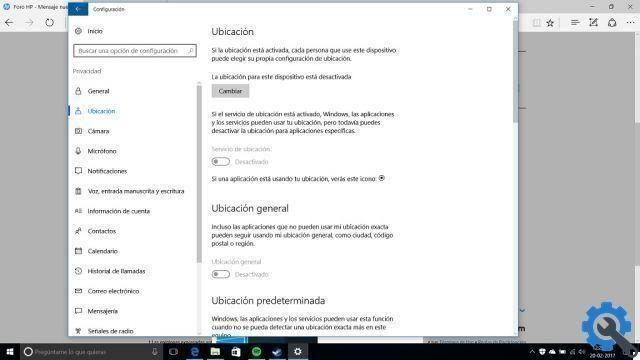
Once in the configuration window, we click on the “Privacy” option and it will redirect us to another window with a sort of side menu with other choices, we click on the second option, “Location”.
It will show us a section on the right side with all the options available to configure the Windows location. Next, we select "Change" and it will show us a mini window which contains a button.
The main function of this button is to enable or disable the location in a general way in the operating system, that is, all applications will have or will not have access to the location.
Enable or disable geolocation in specific apps
Since we have learned how to enable or disable location in Windows 10 globally, we will now teach you how to do it individually. For certain applications.
Since, as mentioned above, some programs require this process to perform their functions and function properly.
Then, we perform the same procedure as above, select the start button and click on the option "Settings", then up "Privacy".
Let's go back to the left side menu in “Location” and look at the options it shows us on the right.
In order to configure which applications can and cannot use the location, we must first make sure that the process is active. This is done (in case it is deactivated) by giving the option “Change”.
Already make sure the position is active, scroll down with the mouse until you reach a list of applications that the section shows us.
These applications that you can see are the ones that need the localization process in some way or indispensable way.
All we have to do is click on the buttons next to the application name to activate or deactivate as you like.


