


Work in Word without problems: skip and add new words to the dictionary
After you download Microsoft Office online for free to use Word. Adding words to the dictionary will ensure you do work without the hassle to see your work in Word full of "errors" that you know very well after all.
To perform the action of skipping and adding words to the dictionary in Word, what you will need is to have any version of Word installed on your PC. Then you have to insert the document where the spelling and grammar errors should be found and from there you will start carry out the following steps:
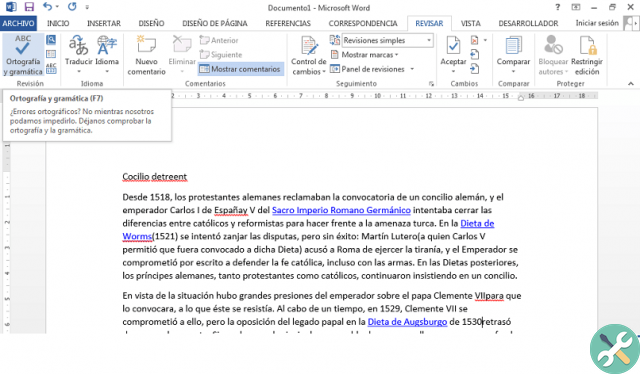
First step to hide the spelling checker: go to the "Review" tab
You will be able to see this tab once inserted the document in where you find the "errors" marked by Word.
This tab is located five boxes after the Home tab, right next to the "Matching" tab. Click on that tab and an options bar will immediately appear and the first option is titled "Spelling and Grammar". Just click on this option and if you have flagged errors it will appear a pop-up window.
Second step: make changes from the pop-up window in Word
In this window, you will have buttons with different options such as: "Skip once", so that the misspelled word is ignored in that paragraph only.
You will also have the option of «Skip All», to jump all words marked misspelled in the document. Finally you will have the option of «Add to dictionary», so that they are saved in your personal dictionary and in the articles where these words occur, they are no longer marked as errors.
This is one way to make sure there are no more words marked as errors, but a permanent solution is hide the spelling and grammar checker in Word, enabling or disabling it in a simple way.
Ultimate solution: hide the spelling and grammar checker in Word
To do this, you need to basically perform the same steps as the previous process. Only this time, when the pop-up appears, you won't add or omit words. If not, you will end the problem once and for all by disabling Word fixes.
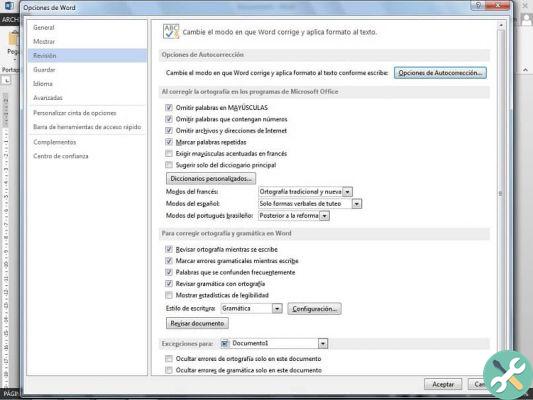
Once you are in the pop-up window (remembering that to access it you have to go to Control> Spelling and Grammar), notice that in the lower left part of it appears a button with the word "Options".
Click this, a larger pop-up window will appear. This displays options such as "Check spelling as you type" and "Mark grammatical errors as you type", these options can be turned off with a single click. You can also click to hide spelling and grammar errors only in the document you are creating.
carry over these changes to the corrections proposed by Word, you have to enter the same pop-up window. Only this time you will have to reactivate the spelling and grammar options that you had previously disabled.
Finally, we remind you that in addition to hiding the spelling and grammar checker, you can also change the language of the spelling checker in Word, which is very simple.
Have you seen how simple and easy it is to hide the spelling and grammar checker in Word? With these helpful steps we've provided, you can turn these fixes on and off at the time that's most convenient and practical for you. In this way you will be able to work in Word, without problems or inconveniences, indeed, you can adapt Word to you.
TagsParola


