Well, with today's lean world, the more efficient you are, the better for the company hiring you, and that efficiency goes hand in hand with computer programs. Having said all of the above, we will now focus on learning about how to insert and edit pictures in Word, quickly and easily.
Remember, this isn't the only skill you need. Word has a set of tools for the user, which you will have to master little by little. By knowing how to insert images into a file, you can continue to learn other kinds of things. For example, how to create a professional outline in Word.
The only requirements are a basic knowledge of the use of the computer, in order to follow the instructions. And of course, after downloading and installing Microsoft Word from its official website. Note that this is a paid program, but you can get it for free thanks to the proof offered by its developers.
If you install it, but then it doesn't meet your expectations, or you don't have the money to buy it, you can easily uninstall the program to save memory.
We are now ready to begin the process insert and edit images in Word. Read carefully and don't get frustrated if something seems difficult, in no time you will master it. It would be great if you practiced, experience it firsthand as you follow the guide. If you see an eye-catching tool, but we haven't given it a name, use it, try it for yourself.
What is Microsoft Word?
Word is a computer di testi of the Microsoft Office suite. This type of software allows you to insert images with text into Word in many different ways. Over time, these programs of the Microsoft Office line have dominated the market due to their efficiency and value for office automation.
Usually, companies appreciate those who have knowledge of this and the rest of the Office programs: Power Point, Excel, are some of the most recognized.
Step by step to insert and edit pictures in Word
Having already entered the processor, we will see that several sectors appear at the top of the screen, such as: Home, Insert, Design, Format, References and so on. We will choose the option Inserisci and the options corresponding to this menu will be displayed.
Two of the most important and important icons on the Insert tab are located on the left and are called Images e Images online. The first will allow us to add an image from our computer to the file. The second will allow an online image search, or will insert it from One Drive.

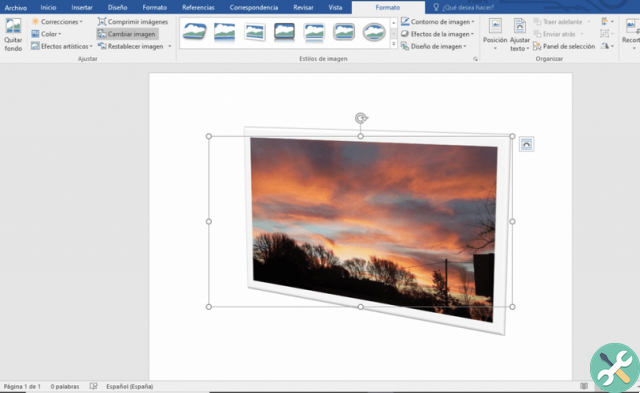
Once we have inserted the image we choose, we can click on it and, by pulling the white circles that appear on its edges, change its size. Furthermore, using the cyclic arrow (also appears by clicking on the image), we will have the possibility to rotate it.
If you double click on the image and go to the options above, you will see that one says Crop (in the right corner). If you choose this option, black bars will appear around the image. By moving the bars, you will cut the pieces you want.
Now it's time to try the rest of the tools for yourself. Always selecting the image and working with the options on the Format tab. You can add borders, artistic effects or just leave them at their default value.
If you have trouble adjusting images and text at the same time, use the options Position and Word wrap, which both show what they do with the illustrations.