


Microsoft Office Publisher is known as software that can help you create and design informational brochures, flyers, and newsletters. Likewise, this program has several instruments with which you can make some cards, calendars and various invitations.
Likewise, it is popular for its uses with various text documents and marketing tools, thus supporting the creation and design of various websites.
Publisher has many templates, as well as a wizard, ideal for helping all of its users while creating papers.
Within its platform, you have the possibility to insert a frame, in which you can insert an image that is inside your computer or that, failing that, has been copied from another site. In addition to giving you the ability to create a product catalog so you can share it wherever you want.
In this post we want to help you enter several images in your Microsoft Publisher files so that you can find in them the perfect balance between what you want and what you can do with all its excellent editing tools.
How to insert a frame into a Publisher document step by step
To get started with this activity, you need to follow the instructions below:
- Start by running the program and proceed to locate yourself on the option "File" which will open a drop-down menu within which you have to search and press the option "New".
- There you will see a series of options of which you need to press the “Insert” button and wait for it to provide you with another drop-down menu.
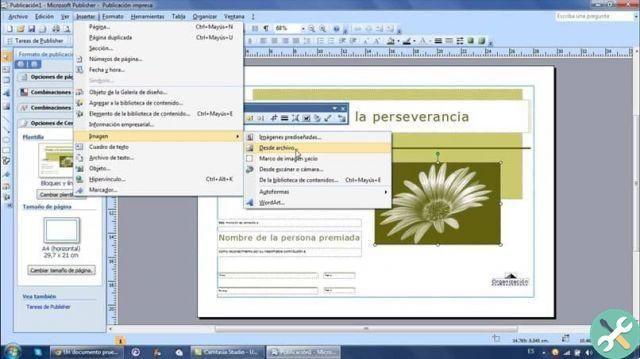
- There, you can place the cursor just above the word "Image" and the same system will offer you a number of options, including: Media Gallery, From File, Frame blank image and from the scanner or camera.
- Here you need to locate yourself and just one click on the option "Empty frame". When you press it, you will see that a frame will appear right in the center of the document.
- By placing the cursor right on the dotted line of the frame and holding it down, you can position the cursor just in place to drag your image frame to where you want it to be.
- After that you have to click on the frame and you will be able to see how different small circles are placed around it to the image.
- By hovering over it and dragging these points, you can change and adjust the size of that image, until you get the image with the desired size.
Benefits of Microsoft Office Publisher
- With this program you will be able to efficiently create different types of publications, which can have a high quality, so you will have no problem helping to reflect and create the business card of your project or brand.
- If you want to have some kind of preview on accessing templates, this will be a great app to explore hundreds of high quality custom templates and effects.
- If you wish, you can connect with yours customers, through the online customization offered by the platform, with which you will no longer have to worry about any detail, ever again.
- Likewise, you have the option to convert all your files and documents to PDF or XPS format with the simple movement of a click.
This is an excellent content creation and editing platform, which offers several advantages over the market. Likewise, being the best known in the world, it has instruments only e at the same time very intuitive with which you can go from a simple design to one acclaimed by everyone in your workplace. Do you feel ready? Start creating
TagsEditore


