


Making columns in this word processor often generates doubts among users, so in this article we will explain step by step how can you create them. In this way, we encourage you to read all the information provided in this post so that you can apply it to your documents.
Step by step to add columns to my documents
Applying columns to our documents allows them to have a better view and order when reading, here we will explain how to do them step by step:
- You have to open the Microsoft Word program which you can download from its official website.
- You have to go to the tab that says «Page layout» or «Format», pressing there you will see many column templates that you can choose from. Therefore, select the column template you prefer and start creating your document, it will be done with the format you have chosen.
- If you only want a small text to appear in the column, you just have to select it and then choose the column template.
- You can hit the option that says "More columns" in case you want to order more information.
- In case you have already written the entire document and want it to appear in a column, simply select the column template and assign it "Apply to entire document".
- Finally save the document so you don't lose the information and voila.
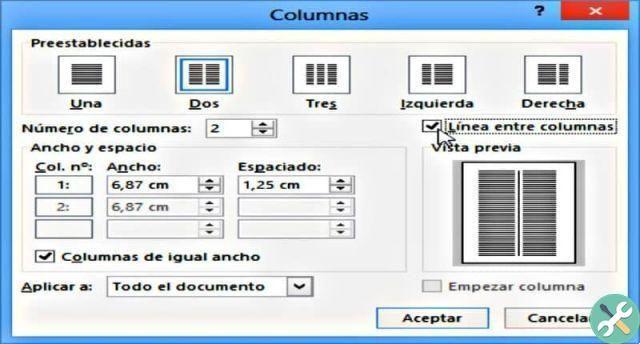
It `s important to note that Word automatically sets the column widths to fit the page style. If the design of your document does not fit the predetermined values, you have to indicate yourself and change the width of the columns, here we explain how you can do it:
- You have to go back to the «Page Design» tab, there you will find the option "Other columns"
- Pressing will open a window in which you will see the option "Fit column width, space and lines". Put there the size you want your column to have.
- This can also be done by using tables to break down all the information you want to enter.
Why is it important to insert columns in my documents?
Word is one text tool which is used for many documents since editing can be done easily, you can also create and edit Word documents with your android mobile. This program is useful because you can place tools as columns, using them from the beginning or, as we indicated above, you can create and then compile them.
In many cases we need to add columns to our documents as it helps us to split our text to view it in a different way. Columns are generally used via media since their use facilitates the reading of documents.
Columns are an excellent tool that allows us to organize any text so that it looks interesting when reading. However, if you need to edit the document, you can easily remove a column, row, or page break in Word and continue writing the document. Using columns is very simple, it is important to know how to do them in Word because we never know when we will have to use them, so we hope these simple steps have helped you.

If you've already learned a insert or create columns in Word, keep reading our articles where you will find all the information on office automation so that you can apply all these tools in your documents. Also on this site you will find information on many areas that you will like and help you at all times.
TagsParola


