


Also, you don't have to be a professional to be able to put a Slider on your website, it's just a few minutes to do it. The only downside you have is that they don't come by default in WordPress and therefore, here you will know the best plugins for it.
How to insert or insert a Slider in WordPress step by step
While you may already know this, Sliders are image slides that will present your content to your website users. These are all the steps you need to follow if you want insert a Slider on your WordPress site in minutes.
- Once inside WordPress, click on the «Plugins» tab located at the bottom of the menu.
- Subsequently, you will select "Add a new plugin" and in the search engine you will position " Meta slider «, Immediately when it appears click on« Install now ».
- Once installed, click on «Activate», consecutively you will see how this plugin has been added in the admin menu.
- Then click Meta slider and select «Create your first slide».
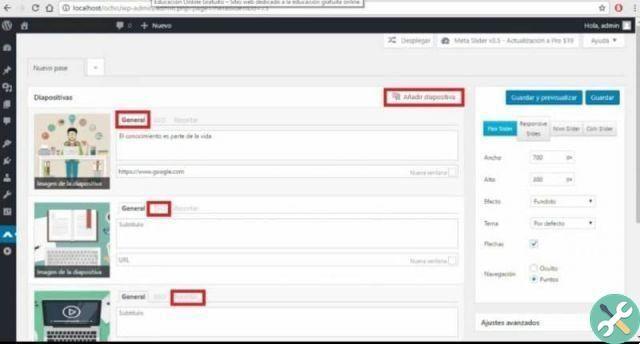
- Then, choose «Add slide» and select «Upload file» and when you have uploaded all the images to create your Slider, you can insert a subtitle.
- If you want each image in your Slider to redirect users to a website, you just need to insert a link. These links are placed on the line below the description of each image you have placed in the Slider.
- Finally, you have to select "Shortcode" that appears in a window on the right side of the page and paste it into any entry on your website.
By following these 7 simple steps you will see how fast you have a Slider on your website easily created in WordPress. Another very interesting topic that you can see if you liked WordPress the most before its updates is how to use the classic editor in WordPress.
How to customize a slider in WordPress
If you already know how place a Slider on your website, it would be perfect if you learn how to customize it, so you can get the most benefit from it. If you follow these simple instructions you will be able to further customize your website using the best and most attractive Slider.
- Once you have chosen the images you want to insert in your Slider, you will see that in each one you can also insert a «SEO title» to improve positioning. This tab is right next to the general tab and will serve you well for search engines.
- Another cool feature you can do is use the "Crop" tab located next to the "SEO" tab. Here you can center any image you have or position them in any orientation of your website.
- On the right side of the WordPress page, you can see a window where you can change the size of each image on your slide. You can also choose different themes, turn off arrows on slides, and make navigation between each image visible.
Also, you can configure advanced settings, this window is just below the previous window and in it you can customize the following parameters.
- Stretch.
- Automatic start.
- To case.
- Slide delay.
- Animation speed.
- Previous text.
- Next text.
- Developer options.
- classe CCS.
- Stampa CCS.
- Print JS.
Once you have customized all the images of the Slider, you will need to copy the link of the Shortcode and insert it in the WordPress page that you will publish. After that you can start creating restricted content in WordPress in order to restrict some of the content you have posted.

Don't wait any longer and start putting or insert a Slider in WordPress in a few minutes by following all these steps. If you have found all this information very useful, do not stop following us and leave us a comment on how you were doing these simple procedures.
TagsWordPress


