


Do you love photography, but are there still details about this editor that you struggle to master? With this post you will learn how to lighten skin with Photoshop. You will see how to do it quickly and easily with a few simple steps you need to follow.
How to lighten skin in Photoshop quickly and easily?
Have you ever wondered how ad models do have such perfect skin? Well, very easy to use Photoshop. So now you too can edit your photos professionally in just a few steps.
You have to keep in mind that the retouching you do in your photographs doesn't turn out to be an abrupt change, because that way it won't look natural.
- Download Adobe Photoshop from its official site.
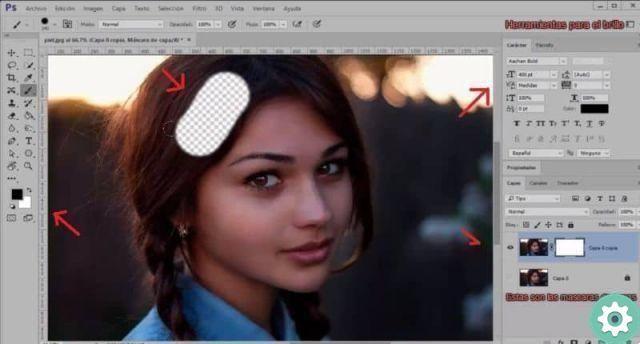
- Open the photo you will use in Photoshop and once the image is in the background of the program, you need to determine where you want to lighten the skin.
- Now, create a layer, so you can see what changes your original image is having.
- Then, create a mask by clicking on "Create Layer Mask" which appears at the bottom of the screen.
- Select the «Brush» tool to mark specific areas, you have to configure the white color to fill all the space around the skin.
- After filling in, you have to go to the "Adjustments" section and activate the option " Lower level »So that all the details you are about to add remain in the skin you have selected.
- Use the "Shine" option to lighten the skin, you can change how clear you want the skin to be.
- Finally, you need to group the main layers, so that any changes you have edited in your photo are saved and that's it.
If you notice that there are still small parts without clarifying, you should enlarge the photo and change the size of the brush to go through those small parts. Flip the image over and turn down the volume of the opacity and flow to get it through those little parts where you can see the difference in skin.
What important points should I consider when taking professional photography?
It is important to note that not only will you be able to perform these professional touch ups with the latest version of Photoshop, in its previous versions you will also find these useful tools. You can also have other Adobe Photoshop alternatives to edit images.
Just like all creative editors want to make their photographs eye-catching, you are no exception. Therefore, we will teach you some tips so that you can consider applying them in your next photographs.
- Photography is an art, so taking a professional photograph takes time and patience, so that the details are perfect and neat. The most important thing when editing a photograph is not to notice that the photo has been retouched to make it look original.
- Find the best photo to edit, this will help you save time, as if a photograph is incorrect from the start it will take more work to retouch it.
- Educate your photographic vision well, bearing in mind this will help you balance the exposure, volume and size of professional photography.
- Innovative in tools, Photoshop is a very complete editor, where you can use many techniques to place lights or effects or, in this case, lighten the skin.
We hope this information has been useful to you so that you can use these professional techniques in your photographs and your photos will attract everyone's attention. If you have already learned to lighten the skin with Photoshop, we invite you to continue reading our blog, as it was created to answer any kind of doubt.


