


Fortunately, with the evolution of technology this has changed. Being able to develop image editing programs that offer a work professional it's wonderful. One of them is the well-known Corel Draw, one of the best in terms of editing, which we can download and install easily.
How to put and apply different shadow and silhouette effects to text with Corel Draw?
With just one click we have access to all kinds of information, the best of all in one place. We just have to know how to use and manage the tools they offer us and in this way being able to put it to good use to put custom effects on text and background, correct the blurry appearance of a photograph.
Without a doubt, one of the most recognized document editing programs today is CorelDRAW. It is very important to fully understand the functions and what can be created with this program. One of them is to apply several shadow and silhouette effects to a text.
Therefore, it was decided to prepare this article, in which all the steps that must be followed to place the shadow and silhouette in a certain text box will be taught.
Steps to create the outline of a text box
The first step we need to take is to open the Corel DRAW application, then let's write the text to which we will apply the effect. We can change the style of the letter and the size it will have to our liking.
Now, we have to create the silhouette that will have our text, for this we select the tool "Silhouette" located on the left side of the screen. Then we position the mouse on our text and, leaving the left button pressed, we drag towards the outside.
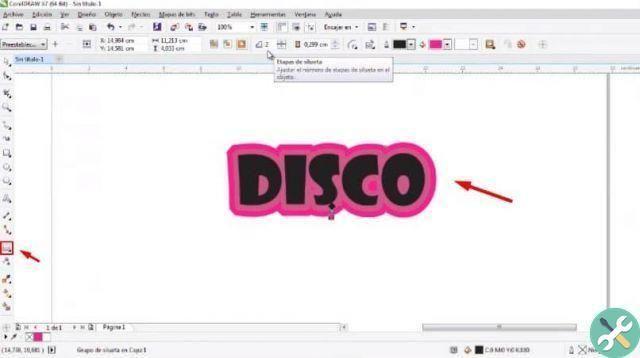
You can see how a silhouette will be created around our text, in the top bar we can configure this silhouette. The distance it has from the text also changes, i BORDI which has and color according to our preferences.
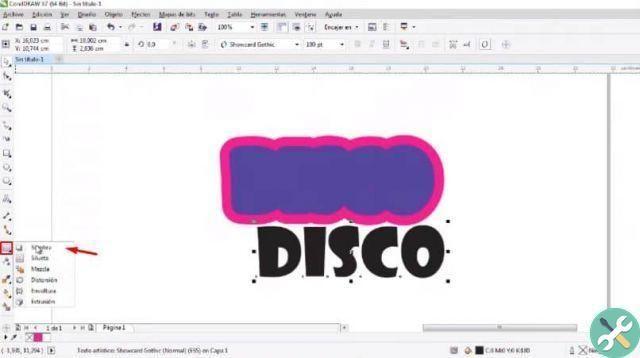
The next step we need to take is separate the object that we have, we must first select everything. Then we click on the option "Object" located at the top of the screen and click on the option "Separate group of shapes".
Steps to apply different shadow effects to text
By performing the previous steps we can separate the text from the silhouette, now we can start applying the shadow effect. To apply this effect, the first step is to select the text we create.
Let's go to the bar located on the left of the screen and let's select the shadow tool. We position the mouse on the text and, holding down the left button, drag it outwards.
We will automatically observe how the shadow effect is created around our text, once this is done we can start configuring it. Above we see le options shadow configuration.
You can change the thickness of the shadow, the direction we want it to have, we can also choose between different shades of color. Then we drag the text over our silhouette and we configure the shadow making it more or less visible.
Finally, we just have to add a shadow to the silhouette that we created for this, we select the option «Eyedropper attribute located on the left. We need to turn off all properties and transform options.
We will leave only the option enabled "Shadow in the effects", accept and now select the created shadow, then paste it both inside and outside the silhouette.
Finally, we should just group objects.
Finally, we hope this article has helped you. However, we would like to hear from you. Have you been able to apply different shadow effects to a text using the Corel Draw program? Leave us your answer in the comments.
EtiquetasCorel Draw


