


Now it's as easy as using one built-in camera function to digitally increase the contrast. It is a relief to have these tools to improve the quality of our work and not have to repeat the image production process if something goes wrong.
A very common effect in some types of images is the well-known fisheye effect that occurs when taking a panoramic photo. Removing this effect has never been easier without the help of photo editing software.
Do you want to know how to remove this effect in your photos? Then keep reading our article that here we will show you how to correct it. In this way you will no longer suffer from this effect, which for some is annoying and you will see that your photos will look much better after correcting it.
What is the fisheye effect?

Before proceeding with the application, we will first explain what this effect is so that you have the clearest topic and understand it better. If you don't know what the fisheye effect is, it's the optical effect that danno all lenses whose viewing angle exceeds 180 °.
In this way the resulting images from these lenses appear concave as if looking at them with the eyes of a fish. Removing this effect with the programs that exist today is very simple, you will not even need to install anything on your pc since it is possible to do so online.
Next, we will show you how to fix the fisheye effect using a free online program quickly and easily. To do this, make sure you have a good internet connection so that you don't have any problems in the procedure that we will show you.
How to remove the fisheye effect?
Removing this effect is nothing too exciting, for this we will use an online tool called Photo-Kako. With it all your problems will be solved as it is easy to use and it will fix all the photos you want.
Step 1
You need to go to the home page of the online application to begin the process of removing the fisheye effect from the images. Just enter the name "Photo-Kako" in your search engine and enter it, the safest thing is that it is in first place in the results.
Step 2
Once inside, go to the upper left part of the interface to add the file to edit in the section "Select file". In this way you will search among the files of your pc the image in question to which the desired correction will be applied.
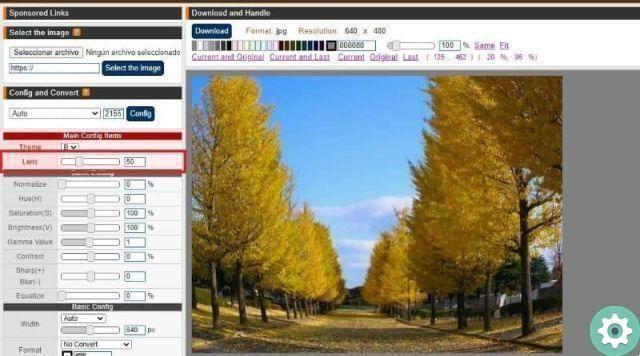
3 pass
After choosing the image you want to correct and uploading it, you will see that on the left side there are several options that you can use. The option we are interested in is called "Main Config Items" where you will change the "Lens" setting over a range of 50-50.
This range may not work in all cases, so you will need to adjust the angle of the lens until you reach the desired one. And with that you would end up, you just have to download the image and you will have already removed the fisheye effect.
True, it was easy, this one online application also offers you other editing tools, so feel free to use them as many times as you want.
So you can give a better finish to all your images by taking advantage of all the tools that Photo-kako puts at your disposal. For our part, we have already reached the end of the explanation and we hope that this guide has been useful to you.
If you are a photography enthusiast and want to learn how to take better photos, we have two articles especially for you, How to take professional photos of people with your mobile phone? And also How to easily take good photos at night with your Android mobile ?.


