


What is Excel and what is it used for?
Excel is a program for computer, similar to a spreadsheet, which allows you to perform operations from simple to very complex. This program is very much in the administrative areas as it allows us to process tables and spreadsheets. However, we can also use it for other less common but equally useful things, like making or creating a Gantt chart.
Generally, Excel is used to create charts, diagrams, accounts, record data, organize information, create invoice formats, create schedules, and even make a daily planner. For this reason, even if you are not dedicated to the financial area, do not hesitate to use Excel in the office, at home or at school because it is an indispensable program on your pc.
Advantages of using Excel:
- Present information in an aesthetic way.
- Perform complex calculations with formulas.
- Record and archive data in an organized way.
- Keep the accounts of your company.
- If you are a housewife, it allows you to create schedules and keep the family budget.
- It helps you save time and lets you do a great job.

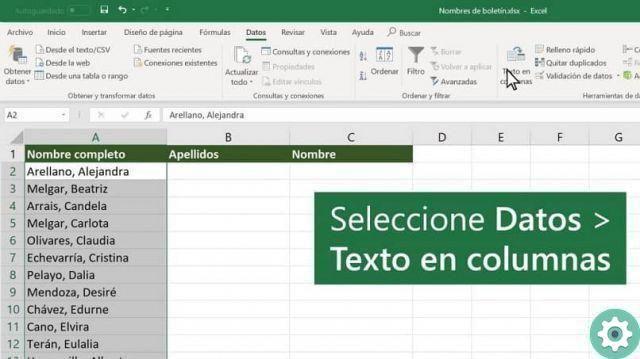
Steps to separate text into columns in Excel
Excel gives us many options to change columns, for example we can change the width of a column without any problems. In addition to this, it also gives us the ability to split a text, first and last names, telephone numbers or dates, which appear in the same column into another or more columns.
- Make sure the columns on the right are empty. If you don't have empty columns you need to insert a new one and you do this by selecting the right column in the name field, right clicking and choosing the Insert option to create a new tab.
- To separate the text into columns you need to press the header of the column that contains the text to highlight the column.
- Go to the tab "Data" and select "Text in columns", you will automatically see a box called "Wizard to convert text to column".
- In the first screen of this box it is necessary to select the «Delimited» option and press the «Next» button.
- Another screen will appear where you need to set the separators that contain the data you want to split into columns. When we talk about separators, we refer to the sign that separates the data that we want to divide into columns; These can be a semicolon, a comma, a space or something else such as a hyphen, asterisk or slash.
- You can see the changes at the bottom of the tab where it says "Data preview".
- Click on the «Next» button
- Another screen will open in which you need to choose the format in which you want to contain the column data; è also It is important to mark the target cell where you want the split data to appear.
- To finish it is necessary to press the button «Finish» and «Accept»; when you go to the spreadsheet you will see the changes made.
Last steps to follow
Something you should know is that in the "Wizard to convert text to columns" box, in the first screen there is an option that says «Fixed width» when you choose this option and press «Next»; This will open a new screen where you can set the width of the fields, moving each row to the desired position and this is achieved in the preview box
To separate the text into one or more columns, you just have to follow these simple steps that this wonderful program offers you, in this way you will avoid doing this procedure manually.
Don't be intimidated by this program, as Excel is a widely used tool which will be useful to students and professionals because it will facilitate the manipulation of data.


