How to set up and enter a fixed private IP address on a Mac device
Although it is a technical procedure, configure, set up and change a private fixed IP address on your Windows or Mac computer is really quick and easy. So, if you were thinking of many difficult steps to go through to set up your IP address on your Mac, you were wrong.
In fact, to enter a fixed private IP address on your Mac, you won't need to install any additional programs on your computer. Nor, you will have to change any configuration of your router or internet modem, as you will be doing everything from the same Mac device.
Next, you will know the simple steps you will need to take to quickly set up and enter a fixed private IP address on your Mac:
- Go to the gear icon, called " Preferences of System ".
- Next, select the "Network" icon.
- In the next window, you will see a menu on the left where you will select the tab related to how you are connected to your network. If you are connected via WiFi, select that connection and then click the "Advanced" button.
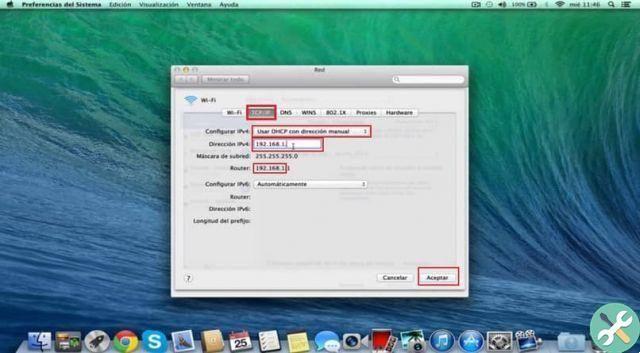
- Now you will see several connection tabs and choose "TCP / IP" and in the "Configure IPv4" option choose to use " DHCP with manual address ".
- In the next option called “IPv4 Address” you have to enter the same IP address as the fourth option “Router”. But you only need to change the last digit to convert your fixed private IP address, you can enter any digit that does not exceed the number 255.
- Finally, click the "OK" button and then click "Apply" to save the changes.
After making these changes, you will see how your Mac computer's internet connection disconnects and reconnects. But this time with yours new fixed private IP address, so you can enjoy a better connection.
Tips for configuring and setting up a fixed private IP address on Mac
As you already understood, it is really very easy enter your new fixed private IP address on your Mac computer. But it would also be very helpful to know a few tips that you will need to keep in mind if you want your new network address to work properly.
Next, you will know a list of tips and tricks that you should consider to set up and enter a fixed private IP address on your Mac.
- Before you begin, make sure you create and configure a working wireless network connection. You can confirm this by logging into any web page before starting to configure the new IP address.
- The most convenient thing is to enter your new fixed private IP address with terminal 254, so your new Internet connection will be more stable. Since when your router starts assigning IP addresses to all connected devices, they will never collide with the one you just entered.
- There are P2P servers that will ask you for your IP address and by entering the penultimate number available on the network (254) you will always remember it. This way, you won't have to enter system preferences every time you ask for your IP address because you will always know.
- Do not try to put the router's last available number (255), as it will not work and you will not have your own fixed private IP address. This because this number is used by the router for system settings and services and is not available to users.

Configure and put a fixed private IP address on your Mac, you can get it if you follow the instructions and advice in this post. Don't forget, follow our blog and leave a comment where we will be happy to answer any questions regarding this technology issue.
TagsMac


![Apple Vice Presidents Talk About Development of M1 for Mac [Updated]](/images/posts/c6254b668e5b3884d6b6338ccb8a02ff-0.jpg)