


Knowing in depth how our devices work is of great help in carrying out any type of activity. The tools that we can have through our devices are very broad and practical.
For many years desktop computers have been used to perform tasks in the best way, they are designed increasingly powerful. In turn they work thanks to operating systems, these are the ones that control all parts of the computer.
One of the operating systems that has been most successful among computer consumers is software Microsoft Windows. This is characterized by being in constant development and innovation, in order to be better and better and provide the best experience to its users.
Likewise, this operating system frequently releases new updates, with more advanced tools and options. An example of this are the screenshot. This function is not only very useful but also very practical and easy to perform. There are a variety of programs that allow you to take screenshots.
What is lock screen capture in Windows 10?

The latest version of Windows OS is Windows 10, this version is much more advanced than previous versions. His design and its interface are among the most practical that we can find in computers today.
One of the functions that is essential to know is capture the screen on our computer. This allows us to create an image of the current screen that we have on the computer, this function can be performed via the command Win + Impr.
But when we are in the lock screen of the our computer or on the login screen, this command does not work. Therefore, we must look for other methods by which to perform this important action.
In this article we will learn all the steps we need to follow to capture the lock screen and log into Windows 10.
Steps to capture the lock screen in Windows 10
If we want to capture the lock screen on our Windows 10 computer, we can do it using the "Snipping" tool. To activate this tool we have to go to the Windows search bar, located in the lower right part of the screen.
Here, we will write cuttings and select the tool, this will open the interface. The next step will be to find the option "Postpone" and select it, then select the option “5sg”.
Finally, we click on the option "New", this will indicate that the meter will take 5 seconds to capture the screen. Therefore, we must be quick and lock our computer screen, after 5 seconds the lock screen will be captured automatically.
Steps to capture the login screen in Windows 10
To capture the login screen, the above method doesn't work, so we need to look for another method. The most practical is configure Windows to start the tool “Snipping” from the option "Accessibility" on the login screen.
To perform this action we need to go to Windows 10 registry, once here we have to go to the following path, HKEY_LOCAL_MACHINE SOFTWARE Microsoft Windows NT CurrentVersion Image File Execution Options.
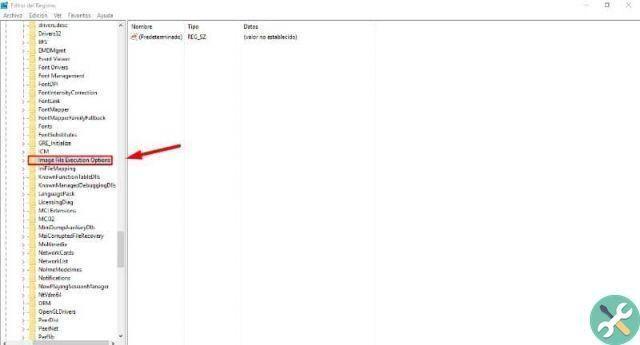
Then we need to right click and select the option "New", now let's select "Key", we will get a box in which we have to write utilman.exe.
Then, double click on the option Debugger, located on the right of the screen, a window will appear in which we will write the clipping path in the Value information box. The path we have to write is C:WindowsSystem32SnippingTool.exe and we do click OK.
Finally, we lock our computer screen and go to the login screen. Now, let's select the Login option, located in the lower left corner of the screen and select the Accessibility option.
By doing this and following the steps above, the Snipping Tool will automatically launch on the screen. From here, we can acquire the login screen without any inconvenience. Ready, we have already learned how to capture the lock and login screen.
You may also be interested in How to easily capture a long screen on PC or mobile.


