


With this property it is possible to configure the format of the cells through codes, all in a very simple way. Keep reading this post so you know how to do it and continue to become a advanced user of Excel.
Use the Pattern property with Visual Basic for Excel
If you are learning to use the function language code in Microsoft Excel, the first thing you need to do is switch to Visual Basic for this purpose. With this editor, prepared for Excel, you can work with fills in a very simple way, and that is exactly what we will explain to you now.
To start applying this property in Excel you need to start by activating the development tab in your spreadsheet. To do this, carefully follow the following steps:
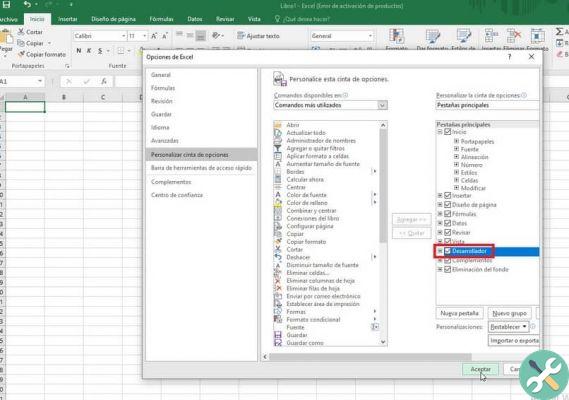
- Locate the "File" tab of the main program window.
- In the menu that opens, click on «Options».
- In the window, find "Customize Ribbon" in the list on the right.
- Next, locate the "Main Tabs" box and, in the list that appears in it, check the box corresponding to "Developer".
- Click "OK" and voila! now you can start programming in "Excel".
With these steps that we have explained, you will have the card " Developer »In the main window, you can get it at the end of the toolbar.
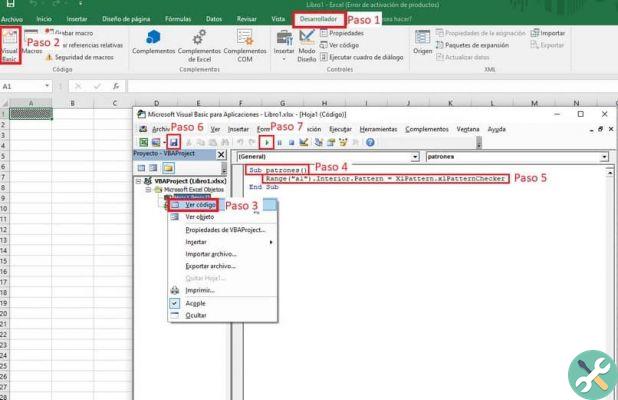
When you click on it, you will see the icon corresponding to "Visual Basic", click to start working with the templates. In case you don't want to activate the developer tab, simply use the «Alt + F11» keys to quickly open the editor.
Steps for working with fill patterns in a range of cells with Pattern
Now that you know how to open the Visual Basic in Excel, it's time you knew how you will work with fill patterns. By doing so, you will be able to internally customize the cell you need with the following styles: horizontal and vertical lines, intertwined, diagonally intertwined, thin or thick, dot and many more.
To apply the fill patterns, the first thing you will need to do is activate this property in the Visual Basic module as follows:
- Using the window of the Visual Basic Editor, select the active spreadsheet in "Project Explorer" (by default "VBAProject Project"). If you have not entered a name, the sheet will be named "Sheet 1" by default.
- Right click on it and select "View Code". You can also do this by pressing the F7 key.
- On the right side, you will have the «Codes» window active, there activate the properties of the templates by copying «Sub templates» and pressing the «Enter» key.
- Then, after deleting the cell (s) to which you will apply the fill patterns, proceed to copy the following code:
- «Range (» A1 «). Internal. Reason = xlpattern. Xlpatterncheker "
- Range («A1»): represents the cell to which you want to apply the fill.
- Inside. Pattern: to activate the Pattern property.
- model xl. xlpatterncheker: it represents the fill style you want to give to the cell, when you copy «.xlpattern» a list with all the available styles will automatically be displayed, just select the one you like best.
- «Range (» A1 «). Internal. Reason = xlpattern. Xlpatterncheker "
- Once the code has been copied, all that remains is to click on "Save" and on "Run Sub" (icon similar to "Play"), the latter to apply the screen to the cell.
In this simple way you can work with fills of a range of cells using the Pattern property. Becoming an Excel expert will be very easy by following our blog, don't miss the other topics.
Etiquetas Office applications


