


Furthermore, it is currently available for installation on various platforms including Windows, MacOS, iOS e Android.
This application allows you to perform simple calculations, from automatically adding a column or multiple cells in Excel, subtracting, drawing or calculating the percentage of multiple cells or between two numbers, to complex functions or formulas, some of which will be preconfigured.
What are vectors or arrays in Excel?
Arrays they are defined as a set of values of the same type grouped as a row / column or row and column.
If the arrangement is one-dimensional, that is, it consists of a single row or column, it is called an arrangement vector or one-dimensional. If, on the other hand, the arrangement is made up of rows and columns, it is called arrangement matrix or two-dimensional.
In a simple way, it could be said that an array or vector is a set of cells or boxes that contain individual variables. Each of these cells that are part of the vector is assigned an index number, this will allow us to assign a value to that cell or to access this value.
That is, to read or write a value in any position of the vector, you must first indicate what the position is, which is determined by the index.
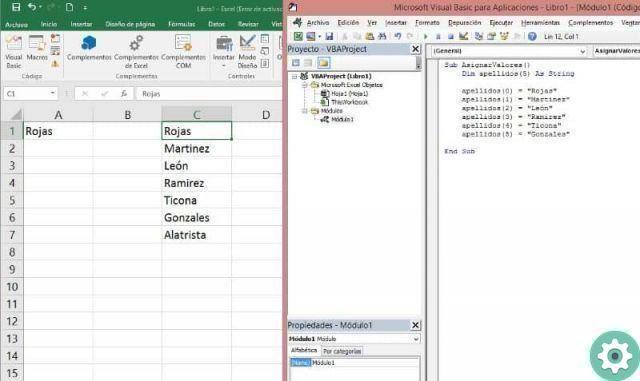
To create a vector, you need to use the Dim statement and indicate what kind of values the vector will contain, which can be numbers, texts, dates, among others. These arrays or vectors are used in programming with Visual Basic, the programming language included in the Excel macro.
How to use vectors or arrays in Excel?
To get started, open the application Excel on your computer and create a new workbook. Once inside, go to the tab Developer at the top of the screen.
Then press the button Visual Basic to open the editor and create a new module. You must first name the function and then you can start writing the vector.
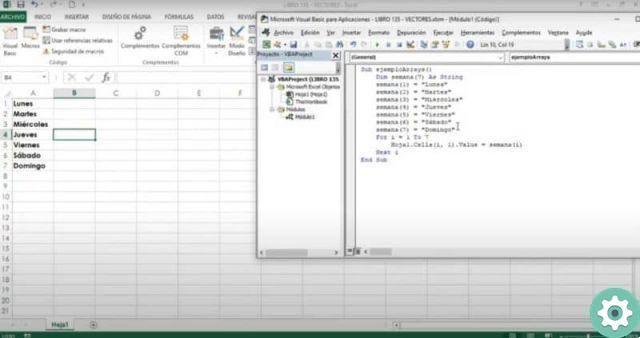
For example, if you want a vector that contains the days of the week, you should write it as follows: Dim week (1 to 7) as a String.
As in the example, after the Dim statement we write the name of the vector and determine the indices in brackets, followed by the type of values contained in the vector.
Since the vector has been created, you can start assigning values by writing the variable name in the next line and the index in parentheses.
The example would be the following: week (1) = "Monday". This way you will assign values to each of the indices.
The result would be: week (1) = "Monday", week (2) = "Tuesday", week (3) = "Wednesday", week (4) = "Thursday", week (5) = "Friday", week (6) = «Saturday», week (7) = «Sunday».
To make it appear in your Excel sheet, write the following sentence: for i = da 1 a 7. On the next line Sheet1.Cells (i, 1).value = week (1). End with the line Next i.
Now save the changes, press the button Run and minimize the Visual Basic window to see how the vector is displayed in your Excel sheet.
Any changes you make in the Visual Basic window, you will be able to see them reflected in your Excel sheet when you hit the Run button.
If you want to continue learning more about this valuable tool, visit the article how to create a form in Excel for data entry.


