


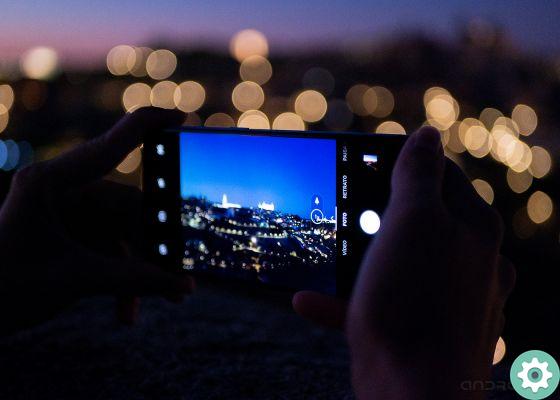
Your mobile is there camera you spend the most time with during the day. And as such, it is important that you learn how to exploit it to the best.
Learn to take better photos with your mobile is the pending argument of many, either out of reluctance or simply because they don't know from where to start for discover everything a recent smartphone camera is capable of.
Therefore, in this guide we show you everything you need to know to enhance photos with your mobile. From tips and tricks to applications you can use.
- Content index
- Know the camera of your mobile
- I want to take better photos with my mobile, where do I start?
- Tricks to take better photos with your mobile
- Applications to enhance your photos
Taking better photos with your mobile is easy if you work hard.
Know the camera of your mobile
You have probably heard or read that "mobile photography is not comparable to photography with professional cameras". And the truth is that it is so… Even if not for the reason you are thinking.
La quality of the images generated by a current mobile phone, especially high-end smartphones, or mid-range ones focused on photography, is comparable to that obtainable from a digital camera.
In fact, the difference lies in the way in which cameras are built and, especially, in the way they are used.
If we start talking about the first aspect, the most important thing to keep in mind is that sensors and technology behind the camera of our phones are much smaller than those of digital and professional cameras.
This means that, in some respects, manufacturers are forced to resort to alternative solutions that serve to reduce this technological gap that still exists today.
We have seen one of these solutions in the vast majority of mobile phones on the market in recent years: multiple cameras. Since no manufacturer contemplates the possibility of add interchangeable lenses, resort to the incorporation of different sensors, with different focal lengths which give the possibility to take pictures with a greater or lesser angle of view, or to shoot enlarged photos without loss of quality thanks to the "telephoto" or "telephoto" sensors.
Focal distance in mobile phones, how is it measured? | When we talk about the focal length applied to digital cameras, we refer to the distance between the optical center of the lens and the focus, which can be, for example, 28, 75 or 200 millimeters. Obviously in mobile phones there is no space to insert cameras with the focal one, so in the case of smartphones we are talking about equivalences that are obtained by applying a correction factor. For more information on this, we recommend that you take a look at our article on how your mobile camera works.

Four rear cameras on OnePlus Nord.
In addition to this solution, mobile device manufacturers must also use software to mitigate the shortcomings of mobile photographic systems. Hence, concepts such as computational photography, Pixel Binning or artificial intelligence have taken on such importance in recent years.
Google, for example, is a clear example of what can be achieved with good software applied to photography, even using mediocre hardware.
As I said, too the way smartphone cameras are used is very different compared to how a professional camera would be used: in general, mobile cameras are designed for a point-and-shoot type of photography, automatically ensuring the most suitable settings for each type of scene.
On the contrary, professional cameras they can offer a much superior experience when using manual versus automatic shooting modes. On mobile phones, since the software has a much greater influence on the result of photographs than the hardware itself, the using the automatic mode is, in general, the most recommended if you want to capture the best possible photo. Do you understand now why there is no manual mode in the Google Pixel camera?
I want to take better photos with my mobile, where do I start?
Now that you have some basics of how your mobile camera works and because it's different from a professional camera, it's time to get down to business and start shooting better photos with your mobile.
The first thing you should do is familiarize yourself with your device's camera: both with the number of sensors, the role that each of them plays and, above all, the different modes of photography and what is each of them for.
For the latter, it is best to thoroughly investigate the camera application of your mobile phone, including all its hidden options and modes.
You should also keep in mind that all mobiles have weaknesses in terms of photography: low quality zoom, small sensors that are not able to capture enough light in night scenes, slow focusing systems ... Therefore, the best is to familiarize yourself with the weak points of your mobile and keep them in mind before going out to take pictures.
The Samsung camera application: one of the most complete.
Having said that, now all that remains is practice, practice and practice. The more photos you take with your mobile phone, the faster you will discover the secrets of photography and the better images you will end up capturing. Even better if you take pictures of other people with more experience in this field as an example. or even professional photographers.
10 tricks to take better photos with your mobile
Newer cell phones can easily replace basic digital cameras.
Any photographer, amateur or professional, can use the strange trick with which to improve their photographs taken with their mobile phone. Here are some tips and tricks, sorted by more basic al more advanced:
Keep your cell phone well
Something very important that is often overlooked: if your mobile is not well supported and there are vibrations, you will most likely end up with an image blurry or poor quality.
Although this problem can be alleviated by a good image stabilization system on the mobile, it is better not to trust yourself and shoot photos as stable as possible. If you want, you can also use a tripod for your cell phone. Most are inexpensive and very useful.
Another little trick in this regard is to take pictures by pressing the volume buttons on your mobile. This way, you avoid having to put your hand on the screen and - probably - move the phone by accident.
Clean the room
If the camera lens is dirty, dirt will not allow the sensor to capture all the light or detail in the scene and the final image will appear blurry or smudged.
Get in the habit of check if the lens is dirty before taking a photo. In this case, in most cases it is sufficient to wipe the screen of the mobile phone or, if this is not possible, to wipe the camera with the shirt or other soft garment.
Frame the scenes
The Pixel 4a is proof that you don't have to spend a lot of money to get a phone with a good camera.
Virtually all mobile phones include a "grid" option that allows you to activate horizontal and vertical lines. They serve for measure and divide a scene, as well as to obtain correct shot.
You can't use the ruler or the grid - although it is advisable to do so - but what's really important is that you learn to frame and compose your images well, keeping a good proportion between the "empty space" and the subject you want to capture.
The type of framing will depend on each image. A general recommendation is to use the rule of thirds, which consists of dividing the screen into different sections using the grid and positioning the subject that will be the center of attention at one of the intersections.
However, this rule does not apply to all photos and you will probably realize this as you practice.
It is also recommended to use the law of the horizon, which simply consists of the position the horizon line of the scene to be captured - if it appears in the image - on one of the horizontal lines ruler or grid.
Either way, keep in mind that, in most cases, you will be in degree of correct the composition of a scene by processing the image with a photo editor. Therefore, we recommend that you don't discard your images for the simple fact of thinking that they are badly framed.
Do not use the flash
Mobile flash is best used as a flashlight or even as a notification LED for your mobile. After all, taking pictures in such strong light ends up being burnt or unnatural looking images.
We already show you a series of steps and tips for taking better photos with your mobile phone without a flash that can help you. Among them you will find some tricks like use your mobile phone's night mode or take advantage of the light sources around you that can illuminate the scene.
Use the right camera
Now that the vast majority of mobiles include multiple cameras, it is important that you learn how use them and exploit them a depending on the type of scene. Broadly speaking, we can come to the following conclusion:
- Main camera: usually the one with the highest resolution, size and aperture. It allows you to capture more details and is able to capture more light. It's the best option for complex scenes - in low light or with excessive dynamic range - or for any type of scene if you're looking for the best possible image quality.
- Ultra wide camera: Offers the widest field of view of all cameras. Brings more of the scene into the image. It is a good option for landscape photos, or when you want to give a different touch to your "normal" photos.
- Camera telephoto lens: is the optical zoom of the camera. If your mobile has one, you should take advantage of it for those photos of objects or people that are far from the camera. If your cell phone doesn't have it, it's usually best to get close to said subject and capture the image with the main camera.
- Macro camera: Captures images at a very close distance from the subject or object. A sort of "microscope" built into the camera, usually at low resolution.
- Telecamera “Depth” o “ToF”: they can be of different types, although in both cases they perform the same task. ToF or depth sensors are responsible for measuring the camera's distance from the subject in the foreground and background of the scene to generate the blur effect known as portrait mode.
Take advantage of portrait mode (not just with people)
One of the advances in photography most appreciated by users in recent years is that of portrait mode. Now it is no longer necessary to have a large sensor like that of SLRs to shoot photo of people with the background out of focus.
If your mobile has portrait mode, you can take advantage of it for give more importance to the subject that appears in the foreground blurring the background.
Some mobiles also offer the option of change the background blur level.
A photo taken in portrait mode, using a Pixel 4 XL.
But don't think that the portrait mode is for people only. You can use this feature to unleash your creativity and take pictures with a blurred background of objects or animals. In the example of the image below these lines, you can see an example of a portrait mode image made with a splash of water. You can see how the camera was able to blur the background of the image without any problem.
Water drop portrait with Pixel 4 XL. The photo was taken in motion.
Take advantage of the "burst mode" to take pictures of moving objects
Although your mobile probably incorporates one professional or advanced mode which allows you to manually control the different parameters of the camera, I am one of those who think that these types of modes, in mobile phones, are not as important as in professional cameras.
That said, one of the fastest and most effective ways to take pictures of moving scenes - for example a photo of someone who plays sports - is to use the burst mode included in the mobile, instead of playing around with shutter speed, ISO and other aspects where you probably won't have time to stop if you need to take a quick photo.
On most mobiles, you can take a burst by holding down the shutter button, the one you use to take pictures. After that, you can choose which photo you want to keep and which ones you prefer to delete.
Check exposure and focus
Quel cursor that appears in your mobile's camera app is the exposure control.
With it, you can increase or decrease the sensor's "exposure to light" level, and although most images automatically calculate the most suitable level, you can change it manually to try out different styles - for example, with low exposure you can capture silhouette images when there is a strong enough backlight.
The same goes for focusing - before taking a picture, you should touch the screen on the subject to be captured in so the camera knows where to focus, even though, again, mobiles are smart enough to know where to automatically place the focus point.
You can also fix the focus by holding down your finger, so that remain in the same position even if the scene changes.
In that sense, you can try put a focus parts of the image different from the subject or object in the foreground to give your photos a more creative format.
Take photos in RAW format
Maybe the way more effective for taking better photos with your mobile phone. The RAW format in photography allows you to get images with all the information included in the file, in order to be able to subsequently modify all its parameters without loss of quality or detail.
Newer cell phones offer the ability to take pictures in this format. However, you can always use applications to take RAW photos.
Use different "reports"
You can take better photos with your mobile, even at night.
By default, your mobile will take photos in 16: 9 or 4: 3 aspect ratio. While it's an aspect ratio that usually works well with most scenes, sometimes it doesn't make much sense to take a picture in this format if your idea is post the photo on Instagram, where 1: 1 images are generally more adequate.
And, if that is true you can crop the image later, sometimes it is preferable to change the "ratio" directly from the camera app for compose the scene during the acquisition process.
Applications to enhance your photos
Adobe Lightroom, one of the most complete photo editors for Android.
Not only the technique of the photographer influences a good image. It is also important use the right tools to enhance your photos, both before and after shooting.
Alternative Camera App
If you think your mobile camera is unable to take full advantage of your device's sensors, you can always turn to one of the best alternative camera apps for Android. Here are some of the best:
- GCam via Android: The modified version of the Google Pixel camera app, with support for a large number of devices. It stands out for having the image processing and functions that the Pixels include, such as the astrophotography mode.
- Open Camera: a free camera app for android phones optimized to work with the hardware of almost any device.
- Camera ZOOM FX Premium- Paid camera app with manual controls, which offers the ability to change any camera parameter, as well as take pictures in RAW format.
Photo editor
After taking your picture, you should modify it to give it your style. On Android, there are great mobile photo editors you can use, some of them almost as advanced as the ones you can use on desktop computers. These are the best you can use:
- Adobe Lightroom – Probably the best photo editor for Android. It is Adobe's tool for mobile devices, with support for RAW and most of the options of the desktop version. Most of the options are free, and you can create your own presets to edit multiple photos in the same style.
- Snapseed: the Google photo editor, with dozens of different options, among which the possibility to automatically straighten images stands out. It is free and allows you to develop RAW images.
- VSCO: a simple but powerful editor. It stands out for its predefined filters and effects which, unlike those of other apps, can give your images a more pleasing look.
- TouchRetouch: an essential app for amateur and professional photographers. It allows you to remove any object or flaw that appears in an image.
We hope that if you have made it this far, you will leave knowing something new about mobile photography and trusting that you are willing to take better photos with your smartphone. Who knows, sooner or later you will also be able to earn a living by taking professional photos with your mobile phone.


