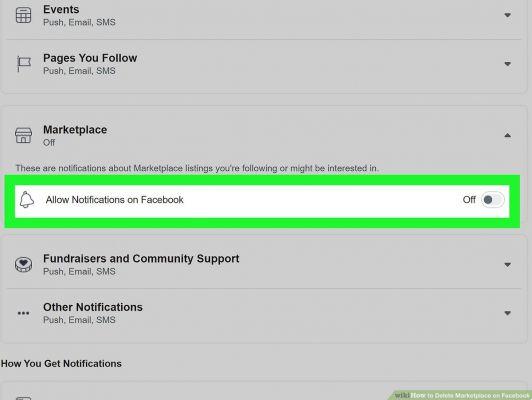
Facebook Marketplace is a great place where you can find, buy or sell new or used products or services. However, the Marketplace icon in the shortcut bar of Facebook it can be an eyesore, and the notifications can be overwhelming.
We will show you how to remove the Marketplace icon from the app mobile and how to turn off Marketplace notifications through facebook.com and the mobile app, so you can learn how to remove Marketplace on facebook.
How to remove Marketplace on Facebook from mobile
Leaving a sales group on Facebook from mobiles and tablets is very simple. First, start Facebook for Android or iOS and press the ☰ button located at the top right (on Android) or at the bottom right (above iOS), touch the item Groups and, on the next screen, locate the group of sale of your interest (based on the preview of the cover images or the name) from the proposed list.
At this point, long tap on the preview of the group, tap on the item Leave group located in the displayed menu, press the button. Close the session that appears in the following warning message and that's it.
To finalize and delete Marketplace notifications, repeat this operation for all the sales groups listed.
Perhaps there is no "quick" way to see all sales groups in a separate section, which could be a problem if you have a large number of groups. If that's the case with you, I'd recommend trying it out on your PC, since, as you'll soon find out, you can use a "trick" to view Marketplace Groups at once.
How to remove Marketplace on Facebook from PC
To log out of the sales groups from the PC, proceed as follows. First, log into the Facebook website as you normally would. Then click on the Marketplace item located at the top of the navigation bar on the left (or alternatively directly connected to this link) and then on the Groups item, also located on the left side of the new screen.
If all went well, you should be able to see the list of sales groups you're subscribed to within the Your Groups section, located on the right side of the newly opened page. If needed, click More to see them all.
After that, right-click on the link of the first sales group entered in the list and choose Open link in another tab from the proposed menu. In this way the group in question will open in a new browser tab, leaving the previously open list available.
Once this is done, go to the newly opened tab, click on the Member/Register button located just below the group cover image, choose the item Leave group and confirm the desire to continue by pressing the Leave group button.
If you wish, you can ensure that group members can no longer add them back to the group (you can however do it independently whenever you want) by placing a check in the appropriate box.
At this point you can close the tab relating to the group you just left, go back to the one containing the list of sales groups and repeat the same operation for all the groups listed.
How to do it if you have Facebook for Windows 10
If you have Windows 10, also in this case you can leave the sales groups whenever you want, thus eliminating the annoying Marketplace notifications (which however do not yet appear in the aforementioned application).
In any case, just as you have already seen for the mobile and tablet application, it is not possible to "group" all the sales groups in one place, but you will have to locate them in the list of groups to which you are subscribed.
All clear? All right, let's proceed.
First, press the ☰ button located at the top left, select the Groups item from the list that appears and identify the sales group of your interest from the proposed list; Once this is done, click on the icon of the group in question, click on the item Registration complete and choose the option Leave the group in the menu that appears.
Finally, click the Leave group button that appears immediately after and repeat the previous steps for all other sales groups to which you are subscribed.
How to disable the buy/sell function of a group like Marketplace
At this time, you don't want to remove Facebook Marketplace, but you do want to disable the buying (and selling) features for a group you manage.
Then this is exactly the section of the guide for you. Below, in fact, I will provide you with all the indicazioni necessary to achieve the goal you have set for yourself (change the type of group), whether you act as cellular or from a tablet, or if you are preparing to do this from a PC.
Before starting, however, I have to make two dutiful clarifications: the first is that you can reactivate the group sale function at any time. The second is that, as you can imagine, you can only make such a change if you are a group admin.
Mobile Phone
If you intend to act in the group of your interest using your mobile phone or tablet, start the Facebook application for Android or iOS calling it from the drawer of your device, press the ☰ button located at the top or bottom and tap the next item Groups., if you are on Android, tap the button in the upper right corner of the cover image and Tap the Access Admin Tools button.
If you're using iOS, tap the star shield icon in the upper right corner. To access the section on the settings group, tap the button of the same name found on the next screen.
At this point, locate the Group Basics section, play the type of vocal group that corresponds to it and select an option other than Purchases and Sales from the list that follows (e.g. Clubs).
When you're done, tap on the Save Entry option located at the top right corner. From now on, your party members will no longer be able to sell items through it, the panel that will open later.
Once done, tap the Admin tab to see only the groups for which you have administrative permissions (only available on Android) and select the group.
If you want to go back and enable the selling feature for your group members, simply repeat the steps suggested above, making sure to put the checkmark next to Sales & Purchasing attached to the Group Type panel.
personal computer
If, on the other hand, you use Facebook regularly through your PC, the procedure to follow is somewhat different.
First, go to the website of the social networks, log in and click on the Groups item located in the Explore section of the left navigation bar.
Next, find the name of the group you want to act on in the Groups you manage box, located in the next window.
At this point, presses the button (i.e. placed in correspondence with the group in question and choose the Edit group settings item to access your administration screen.
Once done, scroll down to identify the Group Type section (which will be set to Voice Buying & Selling) and click on the corresponding Edit item.
Finally, mark the most relevant element for the type of group you are interested in (different from the «Purchases and sales» element) and press the Confirm button to make the change effective. From now on onwards, the members of the group they will no longer be able to list new items (which you and other group admins will continue to do, however).
As already mentioned, you can reactivate the buy/sell features for group members in an extremely simple way. All you have to do is repeat the procedure described above, taking care to select Purchase and Sale when choosing the type of group.
Facebook Marketplace for Windows 10
You can also disable the buy/sell features from within the app Facebook per Windows 10, in a very simple way. After launching the application, press the ☰ button, choose the Groups item in the menu that appears and select the group you want to act on from the proposed list. Alternatively, you can achieve the same result by searching the corresponding bar above.
In any case, once in the section dedicated to the group, click on the Statistical data and tools for administrators element, touch the settings of the element attached to the next window and then Group type.
Finally, choose an item other than Purchases and sales and confirm everything by clicking on the Save button located at the top right.
You can reactivate the feature in the future by repeating the same steps and selecting Purchases and sales from the screen according to the type of group.