


Microsoft Publisher gives you the ability to create your own calendar, in a wide variety of designs and templates, which also has the ability to add different images and text. In this post we want to give you complete instructions so that you can design a calendar within the Microsoft Publisher application.
How to create the calendar in Microsoft Publisher
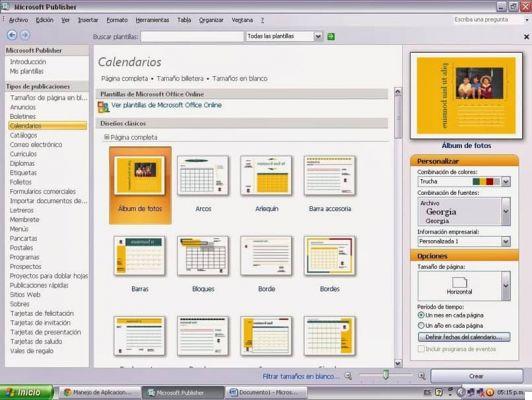
- Start by creating a new file within the application. Next, proceed to select the option "Calendar". There you will find an extensive list of publications, which you can choose from. This is where the panel will show you several options regarding the templates you can choose for your calendar.
- Once you have finished the first point, you need to choose which type of calendar you want to start creating. You can choose between more models and design, among which the positioning and dimensions vary. If you want to see one by default, you just have to click on one of the templates that come with the program or that you have designed so that it shows in mode "preview".
- To add categories, photos, words or any special detail, you just need to click on the box of said available options which are available in the options bar.
- Likewise, this is where you should start selecting the color and font combination you want your calendar to carry. You can do this by positioning yourself on the activity panel called " Customize ". There you can choose different color combinations and, likewise, some predefined fonts.
- if you go south "Options" button you can determine if your calendar will be in a vertical position, as well as add a type of background consistent with it or if, failing that, you want it to be positioned horizontally. Here you can change whether what you are looking for is that all months of the year are displayed on a single page or each on a single page page. If you want to add custom events or dates, this is the section where you should enter it.
With this, you can now add the calendar to the section you want and you can add it with the design you like best.

Useful tips to keep in mind
Here we want to leave you some important information that will surely help you when creating and editing your calendar within the Microsoft Publisher application.
- You should know that within the program, you cannot change some of the options for calendars created by default. However, you can change several important aspects such as page size, color and fonts.
- If you change the page size within the "Calendar options", it will automatically switch to the “Publish Options” category and with it you may lose various abilities with which to influence how the date range is changed and applied.
- Likewise, if you manage to modify a pre-existing model within the platform and it is modified significantly, it will become a drawing, which you will be able to use automatically in future projects, as it will be saved as a new template that you will be able to select once saved once you hit the option "Save with name" located on the right in the menu " Fillet ".
- There you will be able to locate yourself on the option "Publisher model" and there access the save menu of the same.
When designing a calendar within Publisher, you can do a quick search and locate a template similar to the one you want to see displayed in the final project. In this way, you can minimize the amount of changes and thus the work will not be so heavy.


