This popular business software has been around almost since its inception on Apple computers. In fact, it is still today the tool par excellence present in every computer dedicated to work tasks.
We can do many things with Microsoft Office, from change its appearance, which is what we're going to teach today, at How to Share Office Files and Documents on OneDrive, among many other features found in the software.
How to change Microsoft Office look or theme on macOS - Dark Mode
Make changes to the appearance of Microsoft Office it is quite simple either to change some details within each tool such as changing the language of Excel or to customize the text styles in Word, the truth is that the level of customization that the program is very simple. In any case, it is worth knowing the possibilities we have with this software.
How to change Microsoft Office look or theme on macOS - Dark Mode" src="/images/posts/6fab4dd57e5b2a98dab2fa39c7de90e2-0.jpg">
Change appearance from within the program
We can subtly change the look of Microsoft Office, for this we use the tools provided by the configuration of this work suite. This is arguably the easiest way to change the look and feel of Office.
If you want to change the view of the Office programs, consider the following steps:
- To properly change the look of Office, you need to enter one of the programs that make it up. It can be Word, Excel, PowerPoint, etc.
- Therefore, the first thing to do is to start one of the above programs, once the application has started successfully, look in the upper area for the configuration options.
- Click on the program name, which is at the top and left. Once pressed, you will see the option Preferences… you have to click on it.
- The program configuration area will appear on the screen, click on the tab General.
- There are several options in this screen, the one we are interested in is the Customize section, there you will find Office Theme and this is where you can change the look of the software.
- You can choose from the option Colored e Classic, click on the one you like best and do click su OKAY. After that you will have already properly customized Microsoft Office
Dark mode
In addition to the above, it should be noted that there is another way to change the look of your Office, for this we can resort to the dark mode present within the Apple operating system.
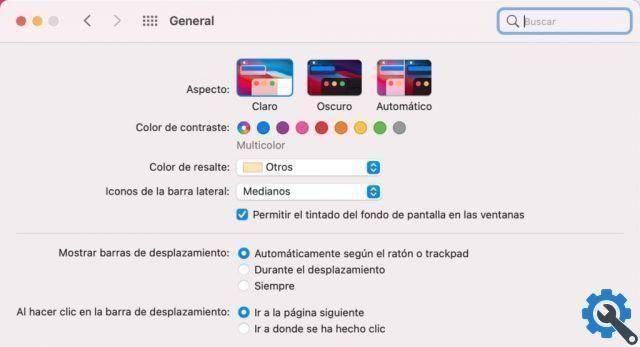
- The first step is to go to the configuration area of Mac OS, this is located in the system tray which has the name of System Preferences, click on this option.
- In the configuration menu, click General.
- The first option that appears in the upper area is Mode: here you can choose between Light Mode e Dark Mode, select the one you like best and press X to close the configuration options.
- Note that this will change the overall look of the system, including Microsoft Office as well.
![<a name=]() How to change Microsoft Office look or theme on macOS - Dark Mode" src="/images/posts/6fab4dd57e5b2a98dab2fa39c7de90e2-1.jpg">
How to change Microsoft Office look or theme on macOS - Dark Mode" src="/images/posts/6fab4dd57e5b2a98dab2fa39c7de90e2-1.jpg">
If you want to prevent dark mode from changing the look of Office, follow these steps
- Open an office application, such as Word. Press On the configuration options located at the top left.
- Now you need to select the Preferences… option and go to General.
- Within the general system options, locate the one named Customize. And there check the option Do not allow appearance to change in dark mode.
- Once configured to your liking, press on the X and you will have configured the look of Office.
The above methods are good for changing the look of Office within Mac OS, start using them right now to add a touch of personalization to this popular work suite.


![Apple Vice Presidents Talk About Development of M1 for Mac [Updated]](/images/posts/c6254b668e5b3884d6b6338ccb8a02ff-0.jpg)