


When you're working with vectors, images, or editing any type of visual content, it's always a good idea to work with the right tools. The fact of being able to working with a tool that makes us feel comfortable and to which we can always go despite our needs is a great advantage.
And we can always go to a large number of programs that are in the market current in order to meet our needs with it.
There are many creation programs as well modification of visual content on the market today. In general, it is always advisable to be able to download the full suite of editing tools such as Photoshop, for example. But there are many others to choose from, being the Corel suite one of the most used for its great comfort and interface intuitive.
Many come to this because many of its processes are very simple and the instruments very comfortable. Among the programs offered by the Corel suite, there is Corel Draw, a program for creating content through the use of vectors.
It is very comfortable, like the others in the suite Corel , and is always highly recommended among various designer circles. And that is why today we offer you a little tutorial so that you can learn how to use it a little more, as we will talk about how to convert the border of a vector into an object, as this always brings a lot more possibilities within a job.
How to convert a vector to an object
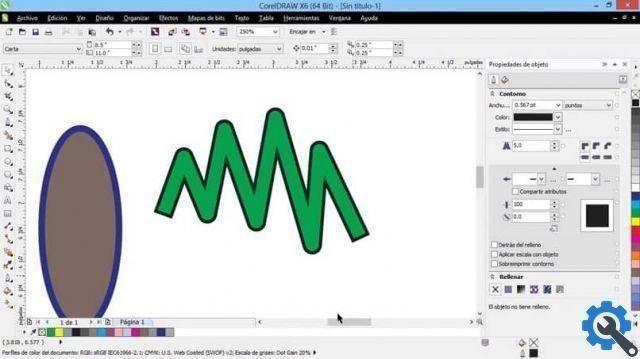
When we talk about converting a vector into an object, we are also referring to "contours". We make this clarification since the program can refer to vectors as "Side Dishes" just like it does in this case.
Also, vectors can be used as outlines if they have a fill. But we will talk about this later. For now we will talk about vectors with non-closed shapes such as a straight or wavy line.
Likewise, when we convert one of those lines into an object, it gives us a great variety of uses that we can give it. We can adapt it in several ways and we can even give this vector a fill and an outline.
To be able to do this, we just have to select the vector we want to convert into an object and go to the option "Object" located at the top of the screen. Here, we will then have to go to the option “Convert outline to object” and that's it.
Our vector that will have become an object and we can treat and modify it in different ways. But it leaves us with the question of what happens to the carriers "closed".

Converting closed vectors into an object
Now, when we talk about closed vectors, we mean vectors that have a closed shape or in which there is no beginning or end of the line. It can be a vector a circle shape, square, rectangle or drop. These types of vectors can be filled with a color due to their shape.
But once we give it a shape and give it a fill, it can't be separated from the fill, unless you turn it into an object.
To do the above, you need to follow the steps we explain in the previous section. You have to select the shape or vector you want to convert to an object and go to the top option that says "Object" and then click on the option "Convert outline to object".
Note that it is entirely possible to do this via Ctrl + Shift + Q to do it much easier. Once that's done, you can separate the starting vector from the fill it might have.


