


The use of information technology has made our life much easier, giving us the ability to access tools that simplify various tasks. In addition to allowing us to access a large amount of information and to be able to gain inspiration.
One of the areas where the use of information technologies has strongly influenced is documentation. We can now store large amounts of information in one place, we also have the ability to change these informations.
Thanks to computer programs it is possible to create documents to our liking. Besides edit all kinds of images and create them from scratch. There are programs designed specifically for tasks like this. One of them is Corel DRAW that we can download and install easily. With this application we can do professional publishing work.
How to create and apply emboss and bevel effect in Corel DRAW?
Corel allows us to work professionally in various fields, with specialized tools on the subject with which we can add contour objects, correct the blur of a photograph, insert text and custom background effects, etc. So we can get precise finishes on our documents. One of these areas is the image editing and objects in which we can create shapes to our liking.
Which means it allows us to reach the perfection in our images. This is very satisfying for us, as we are allowed access to edit our documents in detail. One of the features available in Corel is the relief and bevel effect.
With this we can modify the relief of our creations to our liking. In this article we will focus on the detailed explanation of how to make changes with this great feature.
Steps to apply the emboss and bevel effect in Corel DRAW
The Bevel effect basically what it allows us is to create depth to an object, creating shadows on the edges so that they appear to be skewed. To access this function, the first thing we need to do is enter the option "Effects" located at the top.
A tab will appear and in this we will select the option "Chamfer", with this action on the right of our screen will open the window Bevel configuration. It is important to note that to apply these effects we must already have the object to be treated on our sheet.
To start applying this effect to our object, let's first select the object, now let's go to the Bevel window. The first option we find is "Style" this allows us to apply one sanding or embossing style.
The “Smoothing” style creates the effect that makes our object appear as if it is lifting off the sheet. The "Emboss" effect instead shows that the object is completely lifted from the sheet.
Steps to configure the emboss and bevel effect
Among the configurations that we can create for this purpose we find “Bevel Offset”, this configuration offers us two options, "In the center and Distance". Note that the "Center" option can only be applied to the "Anti-aliasing" style.
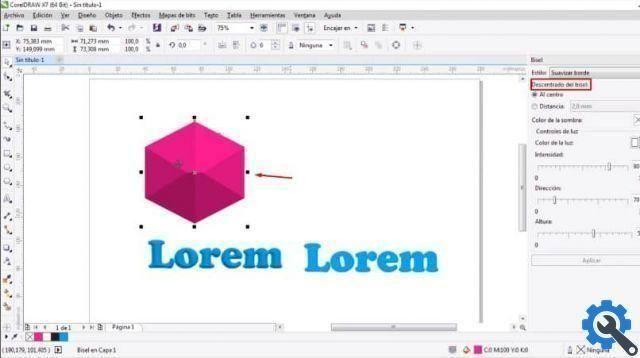
With the option "Distance" we can change the distance that will have our effect, to see how it looks we click on the option “Apply ". Located at the bottom of the Bevel window.
Another configuration that can be made to this effect is the "Shadow color", clicking on the square to the right of this option will show the colors that we can apply. The shadow is basically the relief effect our object has.

The last configuration options that can be applied are i "Light controls", here you can change the intensity of the light, the Direction and the height it will have. Each of these has a bar with an indicator that we can move to our liking.
The Bevel effect is basically like a spotlight is illuminating our object, this is the light we can change with this option. In the case of working with the Emboss style, we will not be able to change the Height option.
Once we have fully configured the effect to our liking, we click "Apply" in so that the changes are saved in this way.
Finally, if you have followed each of the above steps, you will get the bevel and emboss effect easily.


