


3D technology covers many areas, in our case it is the innovation that many digital design programs have that allow us to view images in 3 dimensions; being these: the width, the height and the depth. So in this way we can view the images as we do in real life.
What is Corel Photo Paint?
As we all know, Corel Photo Paint is a computer software used in the creation and modification of graphics raster or better known as bitmap images. We can also perform simple tasks such as cropping images, up to complex professional design work.
This software is characterized by being a versatile and fast program compared to other design programs. Among the various functions that we find in its working environment, we can highlight color equalizers, texture brushes, creative filters, cloning tools and image retouching, among others.
How to create 3D text in Corel Photo Paint
The easiest way to create 3D text in Corel Photo Paint will be described below, in the following steps:
- Once our program interface opens, we will select the option that says "background", located in the right panel in our work environment.
- We will color the background of the worksheet using one of the color equalizers located on the right or at the bottom of the work area.
- We will then insert a text in our sheet by selecting the icon in the shape of "A" which is located in the bar on the right of the interface, to this we will add the font, the size of the letter and center it on the sheet.
- Next, we will select the "Perspective" icon in the top bar and, holding down the Ctrl key + the left mouse button, we will drag the text down to flatten it and towards the center to lengthen it, then click on "apply" to validate the operation.
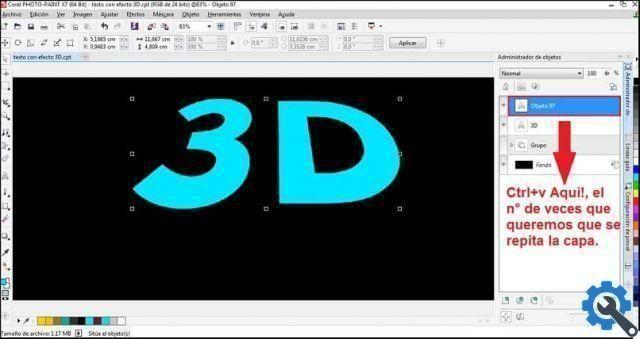
- To give depth, we will select the text layer and it we will copy a certain number of times; according to the volume we want, as indicated in the following illustration.
First 3D display of text in Corel Photo Paint
- We select the last layer of the text pasted on the panel and we press the "down arrow" on our keyboard to give depth to the image.
- Now leaving the first level of the list + the Shift key pressed, we will go to the "Flatten and distribute" window, located in the lower right corner of the panel, and click on "Distribute Centers Vertically".
- We will click on the “Object Manager” window, located in the upper right part of the panel, then we will click on "Combine selected objects" and the first 3D effect of the image will appear.
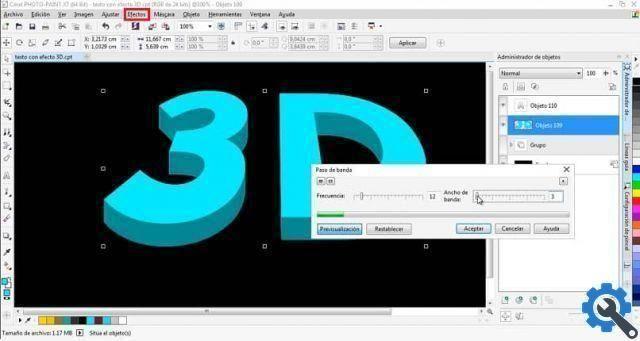
- Once the objects are combined, we will select the "Volume level" in the panel, we will go to the top bar of the interface and click on “effects”, then on “Custom” and finally on “Band pass”.
- In the window that opens Band Pass, we will apply a frequency and a bandwidth according to our criteria, then we will click on "accept" and we'll have our 3D text ready in Corel Photo Paint.
This way you can learn what digital 3D technology is and how to create 3D text in Corel Photo Paint by following 10 simple steps. If you enjoyed this article and want to keep getting quality information, don't forget to share and leave your comment.


