


Steps to create or create a concept map:
- Open a blank Word document. If you are going to perform this process from your mobile, you should first learn how to create Word documents with your mobile.
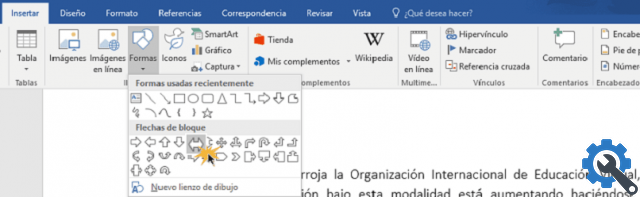
- Go to the options menu e click on the "Insert" tab.
- Click on the "Shapes" box; In this section you will be able to insert squares, circles and arrows which are very useful when making a concept map.
- Choose the figure you want to use for your concept map and slide the mouse to draw the figure you have chosen; dots will automatically appear surrounding the figure, these will allow you to shape the figure to the size you want.
- When you choose the figure, the "Format" bar opens, in this box you can change the design of the figure; that is, you can choose the color, width and style of the outline, you can even fill the figure with a color, gradient or image.
- Place the mouse on the figure and press the right button, a menu will immediately appear in which you will choose the “Add Text” option. By right-clicking on the text you can change the style, font, color and size of the letters.
- After creating the first figure, go back to the "Insert" bar and click on the "Shapes" option, now you have to choose the arrow or the line that will be the link between one frame and another.
- You can adjust the arrows or lines according to the color, size and thickness you want to style your map flawlessly in the “Format” bar (steps similar to points 4 and 5).
- Add the linking words that a concept map contains on the card "Insert" e scegli l'opzione "Text box", in that box write the words you want. By right clicking on the words you can change the font, color and size.
- These previous steps must be repeated for each figure, connecting word, and connecting line to complete the concept map. Or you can copy and paste the first figure and link arrow into the rest of the map to complete it faster.
Tips for creating a concept map in Word
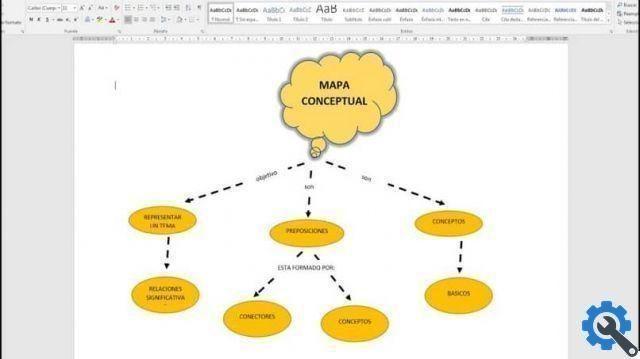
A concept map is used to convey ideas or to learn more easily an argument ; that's why you shouldn't take its realization lightly. It's common for people to think this is the same as making a mind map, but here are some simple tips for making a quality mind map.
A concept map must have three main elements
- Short concepts or short sentences.
- Links which can be lines or arrows.
- Connecting words which serve to connect all the graphics.
Recommendations on the contents to be developed
- You should avoid putting in too much information on the subject; The most recommended is to use the main ideas with some secondary elements, in this way it will be easier to understand the information you want to convey.
- Sort the information by prioritizing the most important information and place it at the top of the map and the least important at the bottom.
- The words or phrases connecting each idea should be short.
- Every table you use must have a hierarchical level, you should never place all tables on the same level as you have to prioritize information.
- It is advisable to frame the text with boxes, rectangles, circles and to relate each concept it is advisable to use lines.
With these simple steps and tips, you are ready to create or create the best concept map in Word; be encouraged to use this tool to enhance learning or teaching. Also, go ahead and insert and edit images in Word to give your mind maps an extra edge.


