


For this reason we always recommend using neutral designs, with light colors, few strokes and, if possible, no text, to avoid confusing the above.
Having said that, let's see how to do it. It should be noted that before starting it is recommended to update Word to the latest version from the official website or download the latest Office package, so that all the options described here will work for you too.
How to put a background image behind text in Word quickly and easily
put a background image behind some text in Word you must first choose the design you want to insert. To do this, you can search from your Google browser or search for one that you have stored on your computer.

Open Microsoft Word, a new one, or insert one you already have ready to complete your design.
insert a picture in Word (or insert multiple images into a Word document) you need to click on the Insert tab you have in the toolbar at the top of the screen.
In this section, select Pictures. When you've found the image in question, click Insert in the box to add it to your document.
Next, it is necessary format it. To do this, you can right-click and go to Adjust Text> Behind Text. Now you just have to arrange the image behind the text in the position you want.
As mentioned above, the legibility of the text in front of you will depend on the colors or design of the image . You can choose to put a black and white image or choose a color, font design and text size that stands out.
How to put a transparent image as a watermark in Word text
You can enter a watermark in Word so that all sheets have the same background. Doing it is extremely simple, then we will explain step by step how to do it.
Insert a new document or one you want to edit. From the toolbar at the top of the screen, go to the Design tab.
From there, look for the Watermark section, it's represented with a blank page and an A across it. Click on it and choose one of the templates that Word offers you. Or scroll the list to Custom Watermarks.
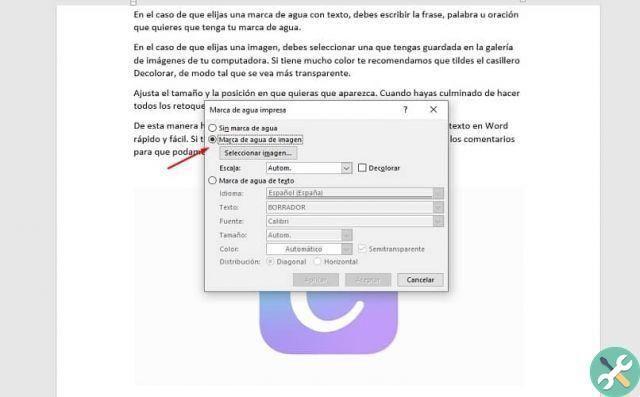
A box will open in which you need to choose between a watermark with text or with an image.
To be able to choose one watermark with text, you need to type the phrase, word or phrase you want in the watermark, the size, font of the watermark, color and layout on the page.
In case you choose an image as a watermark, you have to select one that you have saved in the image gallery of your computer. If it has a lot of color, we recommend that you check the Bleach box, so that it appears more transparent.
Adjust the size and position where you want it to appear. When you are done making all the changes, click Accept.
This way you will have put a transparent background image behind text in Word quickly and easily. If you have any questions, remember you can always leave them in the comments so we can help resolve them.
TagsParola


