This is something that applies to websites of all kinds, especially if we own one that we depend on financially, being an online store. Most of the content we can create for a site can be edited if we need to make a profit.
This is why we need to create new ways to keep our visitors separate from alone content. And a great way for our visitors to interact with the site is through additional aspects.
If you own a website or blog with Blogger, you may have heard the word gadgets.
These gadgets are added to our page, which when used intelligently can make us have greater interaction with our visitors.
That's why it's important that you know how to add one to yours website. It's quite simple, all you need to do is follow the tutorial below.

What is a gadget?
Before we talk a bit about how to add gadgets to your Blogger website, we recommend that you fully understand what a gadget is. As such, a gadgets is a program that we can insert on our page, which has a specific purpose for the visitor.
They can have all kinds of purposes, like being able to share the content of yours website on a social network, which can show certain data, create an options menu in Blogger, and much more. It really gives us the opportunity to be creative and see what can come of it.
Furthermore, within Blogger we can find a large number of gadgets that we can use totally free of charge. However, you can also find them by browsing the web.
However, the latter can be a little more difficult to insert into your website because a little programming knowledge is generally required within interfaces such as HTML o CSS.
Now, taking into account the importance of these gadgets for your website, we will talk about how to include one without the need to program anything.

Add a gadget to your Blogger website
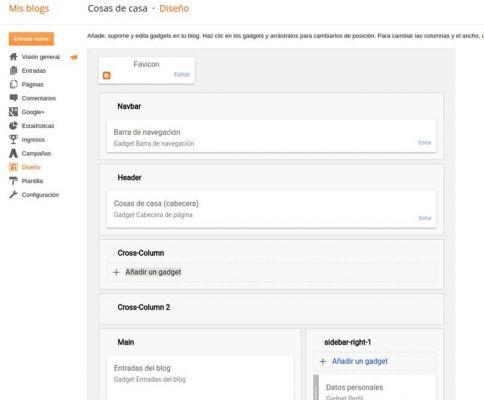
Being able to include a gadget within your website in Blogger is a really simple task. All you have to do is start by entering your blog or website and clicking on the Design option we have in the menu to the left of our screen.
Inside, you can see in detail every component that appears within your template for your website or blog. You have to go to the box that says sidebar-right-1 and click the button “Add a gadget”.
Now you need to search for the gadget you want to include on your web page at the desired spot. Note that the previous step may vary depending on where the button to add a gadget is located.
But, once you have found the gadget you want to add, you just have to click on the symbol more (+) to be able to add it instantly to yours website.
It is possible that depending on the gadgets you have to enter some parameters, but everything will depend on your tastes. Once ready, click the save button and that's it. You can go to your page to make sure everything is the way you want.


