


These help us do the job in the best possible way, providing us with tools with which we can create all kinds of documents. One of them is Microsoft Publisher developed by the Microsoft company, it is available in the Office gallery.
How to add modules in Microsoft Publisher | Insert text inside the shapes?
With this program we can create, modify and modify any type of documentary work, such as creating a publication to be printed in book format, creating and using text boxes, adding capital letters to the paragraphs of a text, creating a logo, etc. It offers us a wide range of options with which we can create from simple shapes to the design of complete web pages.
Microsoft Publisher offers an interface of easy understanding, accurate and feature-rich that allows us to control every aspect of our work. It also gives us the opportunity to share all our work and it is compatible with multiple platforms.
One of the crucial tools this program offers is the creation and modification of shapes. In this article, we will learn how to use the Microsoft Publisher program, add shapes and insert text into them.
Steps to add modules in Microsoft Publisher
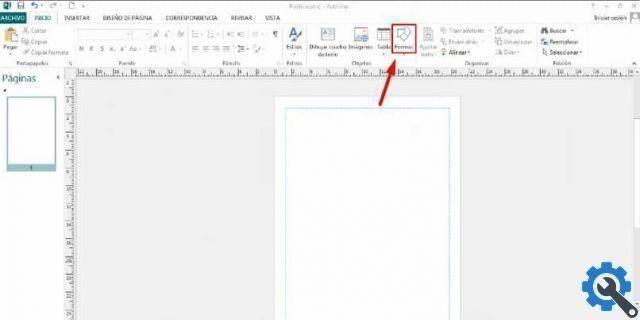
It is very important to know the steps that need to be followed to insert modules into Publisher, the first step we need to take is to open the Microsoft Publisher program. To insert shapes we can do it through two options.
One is from the "boot menu" located at the top of the screen and in the section "Objects" seleziona l'opzione "Form". We can also do it from "Insert menu" and in the group "Illustrations" we click on "Form".
When we open the modules window, we will see all the available modules, organized by different categories. These include lines, basic shapes, block arrows, flowchart, captions, ribbons, and stars.
The next step is to do click on the shape we want to add, then we move the mouse to our sheet. At the point where we want our shape to start, we right-click and without releasing it we drag to indicate the size we want our shape to have and then release.
Once we have inserted our shape in the sheet we can see some points around it, these points allow us to change the size of our shape and also to rotate it. On the other hand, at the top of the screen, will the option "Drawing tools".
From this options menu we can change the shape we create, we can also change the background and outline color of our shape, as well as add effects. Here we find all the configurations related to the design of our template.
Steps to insert text into shapes
The first step to add text inside a shape is to click on the option "Edit text" located within the options "Drawing tools". The text pointer will automatically exit inside the shape we create.
r program
Now we can write the text we want inside our module, we can also paste some text from another page, by right clicking and pasting. To do this, we must first select and copy the text we want to paste.
From the moment we create some text in a form, the option "Text Box Tools" will appear at the top of the screen. Within this option we can do all kinds of configuration to our text.
We can change the letter size, add more characters to change our letter design, we can also change the outline and background color of the text. Add effects and use the centering and margin tools.
Through these two options Drawing tools and “Text box tools we can configure all aspects related to shape and text of our work.


