After that, it's good to know how to insert images into shapes and letters using Adobe InDesign CC, to create nice effects. It is also useful to create multilevel numbered lists with Adobe InDesign CC, to organize your content. You will now learn how to create summaries in Adobe InDesign CC.
Create summaries with Adobe InDesign cc
Step by step we will explain how to create a table of contents or index and we will also cover how to update it.
Automatically create summaries with Adobe InDesign
- Position yourself on the page, create your table and write a title, to select the Font type and Size.
- Open the tabulation table, there you configure the page number alignment: left, center or right ; You can also click Character to see the pick points between the titles and the number.
- Select the box you tabbed and go to New style to create it and give it a name to create your basic style.
- Go back to the box you tabbed and delete it.
- On the main screen, click su layout, then up Contents, click Ok.
- In Title give it a name, then in Summary style select Title.
- Below you can select Index in the style you want to apply.
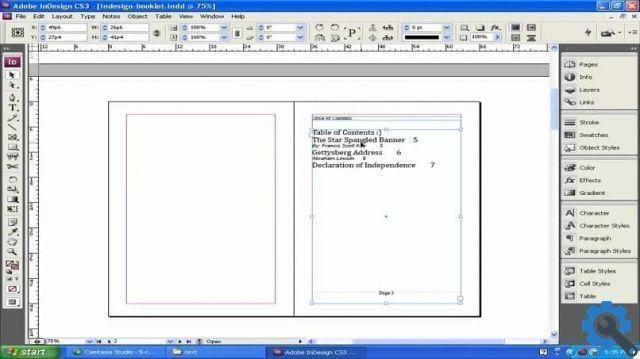
- The summary will appear with the specifications you created.

Another way
- Go to the page and create a table, in the Table menu.
- Now go to the tab Layout.
- While in the menu, click Summary Style.
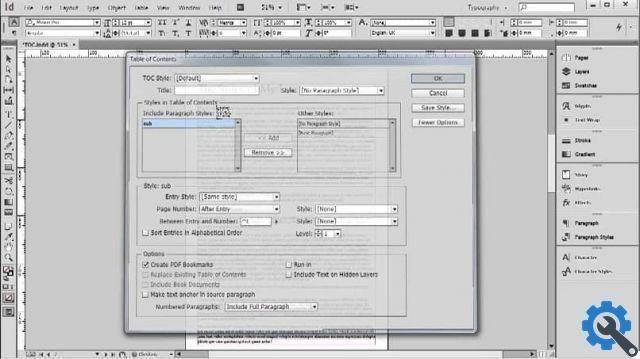
- In the call window New style table of contents creates a name for your table, you do this by typing Table of contents style and Title.
- Go to the bottom right, there in the section Other styles, click on the paragraph style to include in the table: select Head and then in Paragraphclick your Add after clicking on each of them.
- Click Ok and in the next window click Ok again.
How to generate summaries with Adobe InDesign
- On the main screen, click again layout and click Contents, in it you will see the style of the table you have already created, click Ok.
- The table of contents will be generated.
Prepare the headlines for the table of contents
- Go back to the file layout and in the menu click Summary.
- In the Style, change the paragraph style that will be applied to the title, choose Summary title.

- Now on the left side, go back to Paragraph style and click Head, then click the button Other styles On the right side.
- Go back to the left side, locate Input Style and then click TOC Section.
- Now click on Titles.
- Then go to Voice Style and select there Summary titles.
Enter the page numbers
- In the Summary menu go to Number of page .
- There you have three options: After insertion, Before insertion or Without page number, select the option you prefer.
Place the tab character between input and number
- Toccata Between voice and number.
- Select the tab character.
- To display the page number in a different color or style; click on Style at the bottom right, once the number.
- Under Style, select the option points, click Ok; Another window called Styles will appear, click Ok.
- Go back to the Layout menu and go to Table of Contents to view it.
How to update the table of contents
- Executes the title or titles modification.
- Go to Layout.
- And click Update summary.
If you are starting out in this program and are looking to post a particular text; With our article on how to easily create summaries using Adobe InDesign cc, you are sure to be successful!


