


Technology allows us to share memories or good times. But sometimes we want give special effects to a photo and get out of the ordinary. To do this, currently many effects such as changing the color of one image for another with Corel Photo Paint. In this article we will explain how to apply the Glitch effect to any photograph with Corel Photo Paint. But first we will explain what the Glitch effect is.
What is the Glitch Effect?
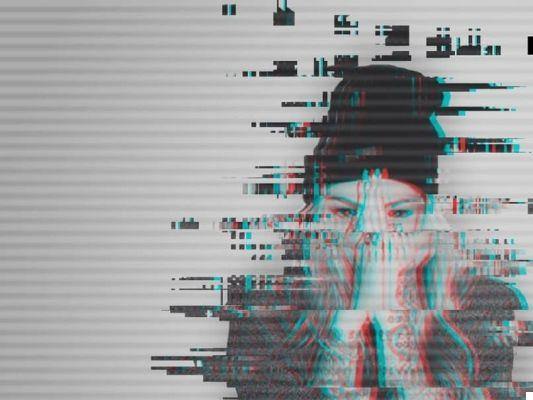
The Glitch effect it is a visual problem that occurred in old videos and old VHS tape movies. This error caused the image to be smudged or pixelated and the image to freeze. You can appreciate it in the following photo:
This effect isn't limited to just images; You can also glitch text in Corel Photo Paint. This effect also exists for videos in other different tools; Since, it is possible to create a Liquid Glitch transition effect in After Effects. But continuing with our theme. Next we will tell you how to apply this effect to an image:
How to apply the Glitch effect to a photo with Corel Photo Paint
The idea is to apply the image to each channel an effect of distortions and hence the effect of running pixels. First we will have to duplicate the original photo so that we can apply the effects to the copy, so if you don't like the work, don't alter the original and you will always have it as a backup.
Once the photo has been duplicated, let's go to the Quick Customization button and there click the Channels option and you can start editing channels. Another option is to click on the Windows menu, then on Dockable Windows and click on Channels.
Another shorter way is to press the Control and F9 keys. Once this is done, for each of the channels you can select them to apply effects to each individually.
Suppose you click on the red channel, then go to Effects, give Distortion and distortion could do Lump. In this window you can specify the editing style you are interested in. You have the Curve, Straighten, Freehand and Queen options. If you choose Freehand, when you go to make the changes you will not have spikes.
If you want running channels to be viewed smoothly, you can choose the Curve option. You can click horizontally and you can choose the percentage scale you want. If you also select Undefined areas you can give the option Repeat edges, so that in those areas where it is done, the border is repeated or stretched.
Once the bulge style is set, you can edit the curve. A box will appear where you can make the points, move them and, if you want to add new points, hold down the left mouse button and drag the curve.
If you want to delete one, click to select it. The selected one turns white and then click Delete. Go to Revisualization P and see if you like the change. Once done, click Accept and you will see the channel mix. You will see the distortion of the red color in the photo. You can use the same procedure for each of the channels or colors.
Then go to Object manager and refute the edited image by giving Control + D. There is a tool, Rectangle Mask, there you can click on the Additive Mode option and you can select several strips of different sizes to make the effect of the pixels shifted left or right. Finally take off the mask.
With the procedure described, now you can apply the Glitch effect on the photo. And also, if you prefer, you can combine this effect with others to get new results; how to color black and white images with Corel Photo Paint, just to name a few. Therefore, by combining the techniques, you will get original photos and have a greater knowledge of this design tool.


