


This is why it is sometimes necessary to place a custom progress bar when running a macro or user form in Excel. Without further ado, it's time for you to quickly and easily learn how to get there step by step.
How to create a custom progress bar?
Custom progress bars are a luxury that will make your work in Excel stand out for your excellent tool management. Plus, you'll get compliments every time you place a custom progress bar when creating macro in Excel because your work will be more explicit.
The only drawback you should consider is that by placing this tool, the Excel program will consume more computer resources. Now that you know, it's time for you to learn how to create or add a progress bar custom when running a macro in Excel by following these steps:
Step 1: Create the progress bar.
- Open the Excel program, click on the "Developer" tab and select "Visual Basic".
- In the next window, choose the "Insert" tab and in the submenu that opens click on " User form ".
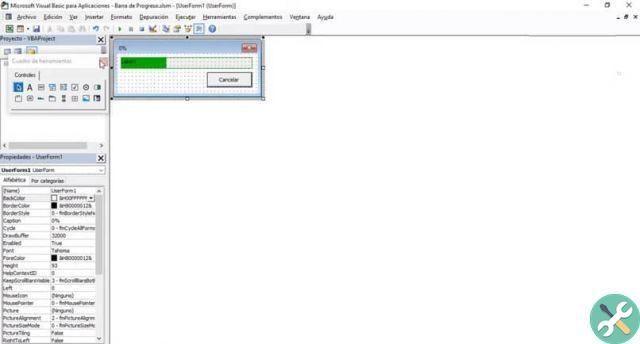
- Now, in the UserForm controls window, select the "Frame", "Label" and "commandButtom" controls and place them inside the window " UserForm ".
- Next, you can customize your macro, in the left menu you can enter the color you want in the UserForm and the caption of the progress bar, among other details to customize.
- After making the customizations of your macro, drag the “Label” bar inside the “Frame” bar, now you have to customize the color of the Label bar, both the border and the inside.
- Then, you will drag the edge of the “Frame” bar to the edge of the “Label” bar to match them at the same size and place them in a corner of your macro.
- The name of the bar is changed " CommandButtom "In" Cancel "And is positioned under the bar" Frame ”To make the macro more orderly (this button will be used to cancel the procedure if the user wishes).
By following these steps you will have ready the progress bar that you will use in Excel, now you will have to change the programming codes so that it is customized.
Step 2: Customize how the progress bar works with codes.
- Click on the button you have renamed with the name "Cancel" for configure its operation and put the following: Finish, press the "Enter" key and in the next line write Unload Me.
- Next, select the “UserForm” tab located in the left menu and click on the macro.
- In the next window, choose the tab at the top right that says "Click", a submenu will open and select " Attiva ".
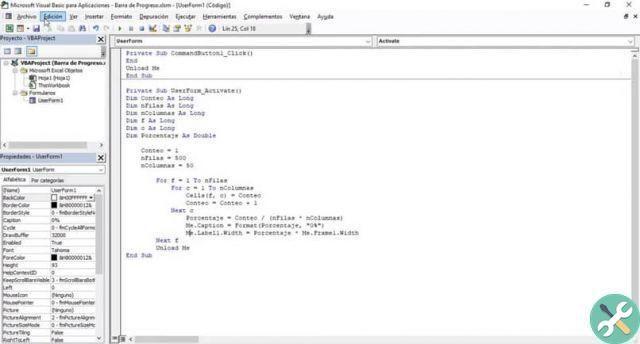
- Now you are going to write the following commands:
Dim counts as long
Dim n Lines as long as they are
Dim nColumns how long
Dim F as long
Dim C the longer
Percentage of attenuation as double
Count = 1
Lines = 500
nColumn = 50
For F = 1 in n Lines
For C = 1 a nColumns
Cells (f, c) = Count
Count = Count + 1
Avanti C.
Percentage = Count / (nRows * nColumns)
I. Caption = Format (percentage, "0%"
I. Label.Width = Percentage * Me.Frame.Width
Make Events
Adventure F
Download me
5. After entering all the commands, click on the " Save ".
6. Select the " User form ”And choose the“ Label ”bar to set its“ Width ”to zero.
7. To finish, click the "Save" button.
By following these simple steps, you'll have your custom progress bar ready while a macro is running in Excel. In the following illustration you will see how the commands should be noted in the programming.
Also, you may be interested in how to use form controls to create budget templates in Excel. If you liked this post on how to create a custom progress bar while running a macro in Excel, follow our blog.
TagsEccellere


