


Knowing how to apply it doesn't have to be complicated at all, on the contrary, it becomes simple with the correct tool and guide. You just need to know the use of the Adobe Photoshop toolbar.
What is the fencing effect in Photoshop?
Knowing what Adobe Photoshop is, what it is used for and what its tools are, the rest is a breeze. This effect is almost as popular as the particle scattering effect in Adobe Photoshop.
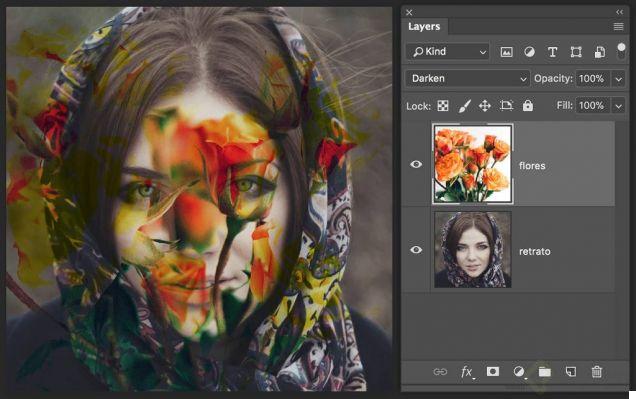
This resource is usually known as " double exposure ', But whatever the name, both terms give an indication of its characteristics.
In this sense, the effect arises from having two images, one superimposed on the other, making them merge into one, but where you can appreciate elements of each.
That is, in general, a photograph is chosen which is the one you want to highlight or place on top of a second one. Rather, the latter will have a background character, to add some specific element or feeling, as well as similar situations.
Do a double exposure
Although it is a simple procedure, to simplify it, understand it and perform it, we will explain it by presenting it step by step.
But first, you will need to select the elements to work with. In this way, the main photo is the one that will establish the shape or figure, and it must contain a space " White ".
The latter will not necessarily be the color mentioned, but it should be light enough. Since it aims to correctly and clearly delimit the shapes included in the image.
While the second photograph can be anyone. These usually try to add a texture or a certain element that the former does not have.

First step
This tries to correct the contrast and brightness of the first photo. To achieve this, Photoshop will start and a new file will be created. Subsequently image 1 will be inserted so that it can then be adapted correctly to the work surface in question.
And this done, the main element begins to receive more contrast and brightness to get the overexposure effect in Photoshop.
Then you need to click » Image «, Then click» Settings ", Then on the option" Brightness / Contrast »And therefore be able to adjust the parameters.
In addition to this, it should be remembered that what is sought is to generate a noticeable difference between the dark and light tones that the representation has.
Second step
In this, the background of the first photo will be removed, which is easier if it is a neutral color. So, you opt for the " Magic wand »And click below.
If an additional element is also included, the tool will be used " Bow »To remove them from the selection. Then, the background is removed to create and paint a new layer in a neutral, light color that will be the basis of the composition.
Third step
After carrying out steps 1 and 2, we proceed to add the secondary photo from " Fillet » e » Place embedded elements ". This is adjusted taking into consideration that only the background will be seen in the different parts of the main photo.
It can be expanded, rotated, flipped or any changes required. And there will be no problem if you want to change or move later, it can be done.
Fourth step
In which the clipping mask will be made, which will remain as the basis of the overexposure effect in Photoshop. Then, click with the right mouse button on the layer of the second image and choose the entry " Create Clipping Mask «.
As a result, it will come cropped simulating the shapes of the main photograph. It should be noted that this effect is achieved only if the latter has white space.
fifth step
Finally, the overexposure will be modeled. Because of this, you need to decrease the opacity in the second image layer.
It is important to find an intermediate point so that the images can blend perfectly, which is what this effect is all about.
Therefore, you will have already finished applying the overexposure effect in Photoshop, although you can make changes or tweaks if you wish before saving it.


