


Microsoft Publisher is known as a program that performs desktop publishing functions, which is included in the Microsoft Office suite of programs. This program is linked to the Word application suite since you also have the option to import a Word text document into Publisher. With it you can create different types of files.
Out of all the great files we can create, files like banners, newsletters or flyers stand out. However, since it is an application similar to the toolbar offered by the Word application, inside it it is possible to take advantage of various graphic options such as inserting or editing images within this program, which will give you the possibility of create any type of project.
In today's post, we want to provide you with some steps, which will help you gain more confidence about the options this application will offer you.
How to show and hide margin guides depending on which version you have?
You can start by alternating the option to activate and deactivate it. However, many users try their best to accumulate them, as this way they focus much more on their publication. However, this is something of a taste staff.
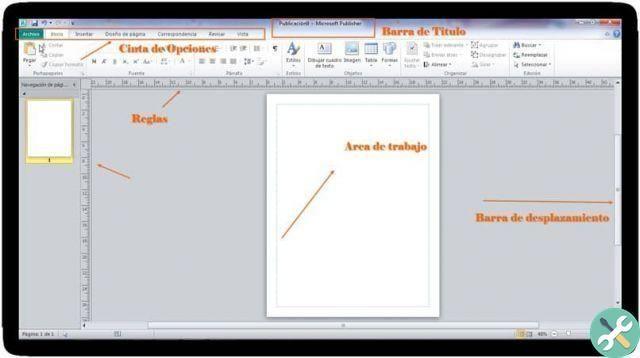
- If you have the 2003 and 2007 version of Publisher, you can make these changes by hitting the option "Rules" that you will find located inside the menu «View». Once inside, you will be able to hide these guides in the margins.
- Within Publisher 2010, if you want to enable or disable this box, you need to search for the "Rules" button and there, locate the option "Show" within the group «View» of the menu bar and that's it.
- When you right-click on any section of the publication and proceed to select the option "Rules" found in the pop-up menu, you will be able to see what appears or the guide.
- Rulers are usually set up so that the top left corner is known as the origin point for both rulers, both horizontally than vertically. You can see that as you move the cursor around the post, the thin lines will move in such a way that they are revealed to you.
How to move the margin guides from one point to another
If the option we present above doesn't suit what you want, you can place the mouse cursor on the ruler and move it.
For example, if you move the cursor, just above the horizontal section, you can see that the cursor will make a change within a couple of horizontal lines, which you will recognize to be surrounded by some arrows, which in turn point towards the part of up and down.
If, on the other hand, you proceed to move the cursor, right in the section that is on the ruler in a vertical position, you will see how you will make a variation towards a couple of vertical lines, which, as described above, you will be able to differences because they are surrounded by arrows that also point left and right.
Similarly, you can choose to move the rulers at the same time, if you start by placing the cursor on the right in the part of the square where you can see the horizontal rulers and vertical. This way, you will be able to see how the cursor will change and you will now see a 2-way diagonal arrow.
Likewise, if you press the key "Shift" on the keyboard and proceed to drag the cursor, you will see that it will change and now it will be a 2-way arrow, with which you will be able to view a rectangle. You will use this object to be able to represent the rule or rules you are moving. Once ready, you just have to release it and the rules will appear in their new location.
TagsEditore


