


Maybe it's time to give software maintenance of the your computer; Many users have chosen to defragment the hard drive for better performance on their Windows 10 computer; in fact, it is what they have successfully tested to optimize their team's processes.
Why resort to hard drive defragmentation in Windows 10?
Perhaps you have noticed that your computer opens applications and programs very slowly. This can happen because files have been disorganized in various parts of the hard drive, by saving or deleting files, by installing programs or by uninstalling them.
Hard drive defragmentation is a process that involves reorganizing your files, which can be a maintenance option to help your computer recover and reach increased speed.
Improving your hard drive performance will help you in many ways on your laptop or PC; In addition to performance, programs and applications will open much faster without having to waste time waiting for them to start, and will prevent them from running additional functions which generally end up slowing it down. In some cases you will have to format it from the CMD, if you need to perform this step to improve the performance of your pc, here is the link.
How to defragment hard drive from Windows 10?
Windows 10 has the advantage of bringing one integrated tool which you can use to defrag your hard drive; This way you won't need to install computer programs to do it, and you'll be running the same operating system it carries Windows 10.
In few steps and in a very simple way we will show you how you can defragment the your hard drive in Windows 10:
How to do it manually
- Go up devices and units, then on Team.
- Right click on "Local disk C" or on your hard drive to defragment.
- Then right click and look for the option property.
- Then go to the tab Tools.
- Then a dialog will pop up, go to the option to optimize drives or to optimize and defragment the drive, press the Optimize button.
- There, another window will open where it will show you all hard drives installed on your computer, (normally this is done on the local C drive).
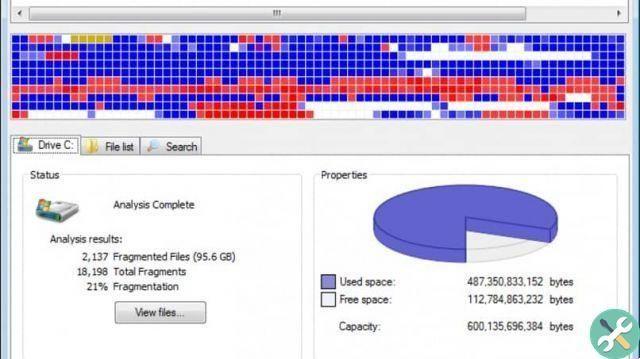
- Then click the button "Analyze" and wait for a while until a certain percentage of defragmentation appears.
- Finally, click "Optimize" and you will already be defragmenting your hard drive; But yes, you have to be very patient, because it is a process that can take up to an hour if this is the first time you do it; but if you have done this before it will take a few minutes.
How to do it automatically
- Following the steps above, locate the option to optimize drives or for optimize and defragment the drive.
- Now press the button change settings.
- A dialog box will appear indicating the scheduled execution.
- Then select the frequency: daily, weekly or monthly (some recommend doing this once a week, so it would be weekly).
- Finally, choose the units to which you will apply these changes and press the OK button.
Although the automatic hard drive defragmentation option ensures this process runs, your computer's performance may be affected; so long as it will consume resources hardware of your computer if you are working on it at the moment. A common mistake that has happened to our subscribers with their hard drive is that it tells them that it is 100%, here we prepare a content with the solution to this problem.
Now you know all the steps required for defragment hard drive in Windows 10 so quick and uncomplicated; Of course, we recommend that you do this monthly so your team will stay optimized.


