


If you've ever wanted the web pages you visit from your PC to be synced across all your devices, you're in the right tutorial. Today we will explain how to do it Google Chrome history appear in the Windows 10 Timeline so quick and very simple. Keep reading!
Microsoft is always finding ways to innovate and offer its users more services and more ways to be efficient in their businesses. Timeline is the perfect example of the ways Microsoft must make your life easier, leaving a history of your activities at your fingertips.
What is Windows 10 history?
Before explaining how to perform this simple procedure, you should know exactly what Timeline is. This is a feature that Microsoft introduced with the Windows 10 2018 update and is characterized by being particularly focused on productivity, more than any previous update.
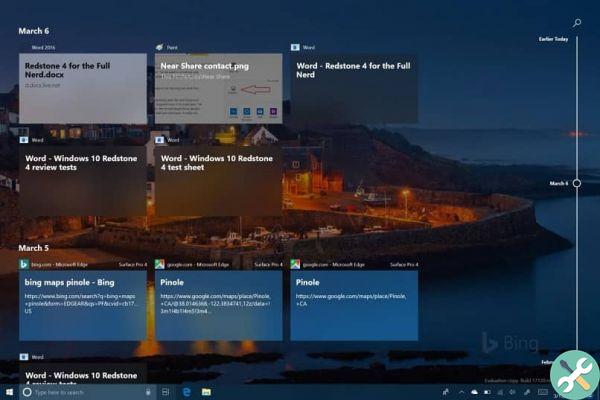
Among the advantages that Timeline offers is the possibility of review a history activity you have had in the system in the past 30 days. Best of all, it can be synced across multiple Windows 10 or Android devices so you always have it close at hand.
Another very good thing about Windows 10 Timeline is that you can delete the activity history very easily; as simple as activating it. So, if you are worried about someone checking it, you can forget about it once the Timeline is turned off.
Previously, this wonderful tool only allowed synchronization with Microsoft Edge, Microsoft's browser. However, the synchronization of all the pages you visit using Google Chrome. In the next section we will tell you how to activate it so that you can start having fun.
Steps to view Google Chrome history in Windows 10 history
If you have already downloaded Windows 10 on your PC, to sync your Google Chrome history in the Timeline you have need an extension called 'Web Activity'. You can get it easily from the Chrome Web Store, so you'll see it's completely official and not a hack.
Once the extension is installed, when you click the "View Tasks" button on the Windows 10 taskbar, you will see that they are now displayed the pages you have visited using Google Chrome. It would be ideal for you to go through the whole process with the latest version of Chrome available.
There are some details you should consider. First of all, to get this sync you need to be signed in with your Microsoft account in Windows 10. And if you want to have it on your Android device as well, you should be signed in on it too.
On the other hand, as is evident, you must have the Timeline of Windows 10 activated on your PC in order to use this Google Chrome extension. But you shouldn't worry about that, in the next section we will explain in detail how you can get it in the easiest and fastest way.
How do I activate Windows 10 history?
- Click the start menu or press the Windows symbol key, then check the "Settings" box, which looks like a small nut.
- Once the configuration menu tab is open, select the 'Privacy' section.
- Immediately after that, look for the “Activity History” option in the bar on the left side of the window.
- Make sure the box with the option "Allow Windows 10 to collect my activities on this computer" either checked, as well as the "Allow Windows 10 to sync my activities on this computer with the cloud" box.
By simply following these simple steps you will have already activated the Timeline and you will have allowed the synchronization of your history with other devices. Also, if you have already installed the 'Web Activity' extension, you will have completed the whole process to bring up the Google Chrome history in the Windows 10 Timeline.
We hope you found this article helpful in synchronizing your Google Chrome history with your Windows 10 history. If you liked it, don't forget to share it with all your contacts.


