


You don't need to have professional design applications like Photoshop to edit images in documents. The word processor already has the ability to edit images within the document. If you don't have Word, you can download it from its official site.
Steps to create a transparent picture in Word
Whether you are a specialist or a beginner, it's never too late to find out how Microsoft Word works. Now, if you follow these steps to the letter, you can change the image you want in a very easy way.
Insert the image into the document
Once the document is open, you will select the Insert tab. You won't select the Insert Image option, but you will select Insert shape.
Select the shape you want to insert into the file. You can place an image in the shape of a circle, triangle, or any shape you want. In this case, to keep the same shape as the image, we select the shape of the rectangle.
Place the image inside the shape
Once the filling shape is in place, the format is changed. Select the Drawing Tools tab and change the outline of the shape, selecting the no outline option.
This is the most important step. Also in the tab select the option fill the form and instead of choosing a color, select the image option ...
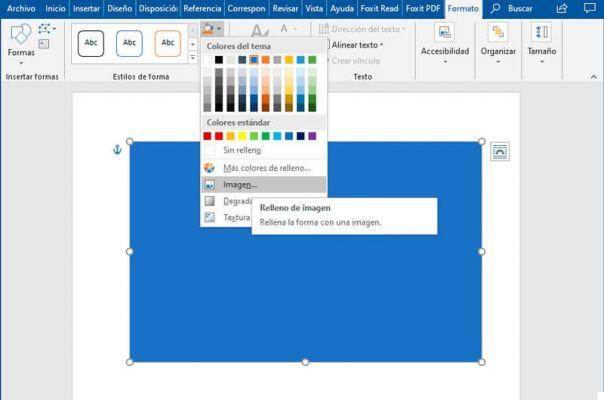
When the file browser window opens, you can select the image as the fill of the shape. Choose the image you want to apply transparency to.
Change the image format with the drawing tool.
We already have the form in the document, but unlike the Insert Image option, two tabs are displayed. There are two tabs when selecting the image. The Picture Tool and Tool tab drawing.
The tab that interests us in this case is the drawing tools tab. After selecting the tab, you need to click on the shape style option.
A picture format menu appears on the right side, with various options available for editing the picture.
Select the fill option and then change the transparency field to 50%. You can change the transparency percentage to your liking.
Check that the image is transparent
You can place the image in front of the text to verify that the image actually now has a slight transparency.
You can also insert another image into the document and drag the edited image over, you will see how it overlaps the other.

Another way to get the same effect on the image
There are versions of Word that already allow you to edit a picture in more detail, from the Pictures tool tab. As in the case of Microsoft Office Professional Plus 2016.
Insert the image or multiple images into the document and select the image tool tab, the transparency option is available.
By selecting this option, various levels of transparency are available that can be applied to the image. To more accurately change the exact percentage of transparency, you need to select the image transparency option.
You can use your transparent image like filigree for your file by repeating it on each sheet. With this you will have a document that has your personal stamp that identifies you or saves the image in different formats.
More options are available to application users every day, and it is no longer necessary to use so many applications to get a job done with a professional finish.
Word is more than just a word processor. It is an assistant that gives you all the tools you need to do the job more efficiently. There its intuitive interface allows even novice users to use the application without difficulty.


